Crimson Desert: How to Use Abyssal Gear & Cooldown Tricks Efficiently
Why Abyss Gears & Cooldown Tricks Matter in Crimson Desert
The point where Crimson Desert really opened up for me wasn’t a story twist, it was when I stopped treating Abyss Gears as random loot and started using them as a system. Once I understood how to socket the right Abyss Gears, upgrade them at the witches, and chain cooldown-reset items like Narima’s Horn and the ATAG mech recharge parts, my whole rhythm changed: more uptime on my best skills, the Black Star dragon, and the mech, and far smoother boss fights.
This guide walks through the loop I’m using now: what Abyss Gears actually are, how to embed and extract them at a witch, how synthesis and fusion upgrade them, the few pieces and gears genuinely worth chasing, and how to reset the big cooldowns so you’re almost never waiting on your heavy hitters.
What Abyss Gears Actually Are (Sockets, Witches & Tiers)
The first thing to get straight, because I got it wrong at first, is that an “Abyss Gear” is not a weapon or a piece of armor. It’s a modular effect you slot into an equipment socket. Think of them as Crimson Desert’s version of runes or gems: each one grants something specific, and you mix and match them across your kit.
Abyss Gears fall into a few broad buckets:
- Weapon Skills – active or input-triggered moves like Ator’s Orb, Shadow Claw, or Wound of Darkness.
- Stat Boosts – offensive, defensive, or utility numbers (Critical Rate, Attack Speed, Defense, and so on).
- Passive Effects – mostly armor-side bonuses that are always on while the item is equipped.
- Banes – situational damage multipliers against a specific enemy type (Bloodbane vs humanoids, Primalbane vs “Walkers,” and similar).
Sockets are limited and depend on the slot. As a rough guide: headgear has 1 socket, gloves and footwear 2 each, chest armor 3, one-handed weapons 3, and two-handed or ranged weapons up to 5. That socket budget is the real constraint, you’re always deciding which effects earn a slot.
Embedding, Extracting & Creating Sockets at the Witch
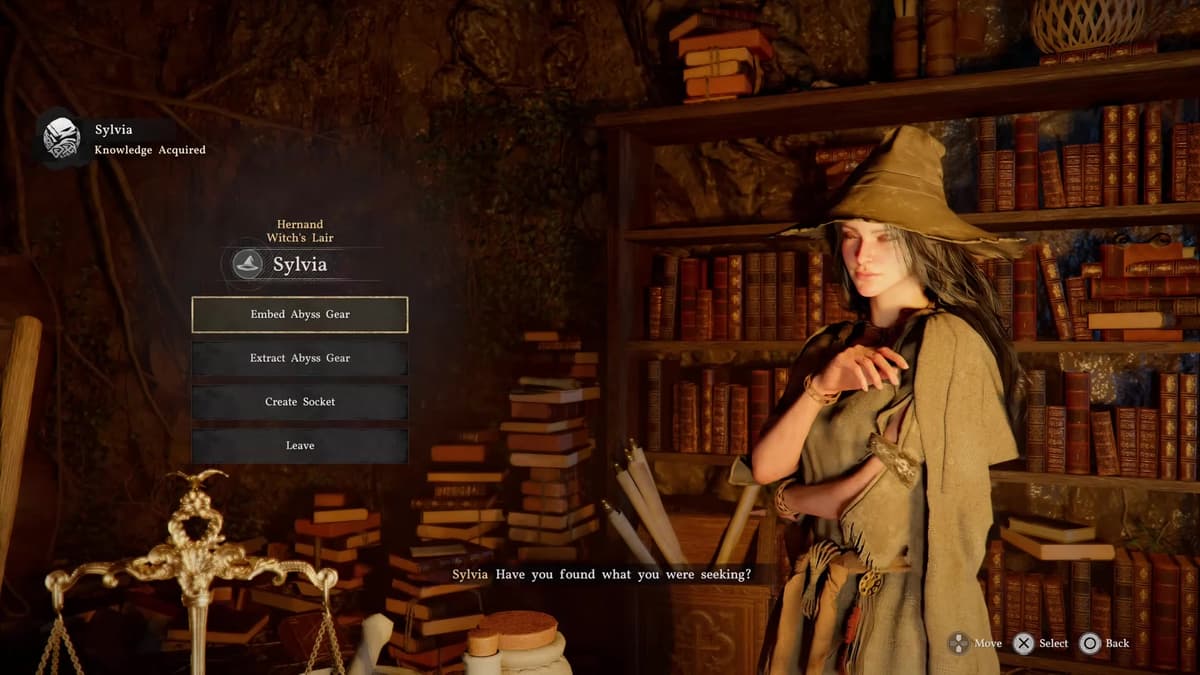
You can’t socket Abyss Gears yourself. There’s a Witch in each region, such as Elowen in Hernand (and Sylvia at the Hernand Witch’s Lair), Lyselia in Demeniss, and Bari in Pailune, and they handle everything. At a witch you can:
- Embed Abyss Gear – slot an effect into an open socket.
- Extract Abyss Gear – pull an Abyss Gear back out of an item so you can move it onto something better. This is the big one: gears aren’t permanently locked to the item they came on.
- Create Socket – unlock additional sockets on a piece (this one costs silver, and the price climbs per piece).
Most witch services are free; only creating new sockets really costs you. Because you can freely extract and re-embed, the smart play is to build a small library of strong Abyss Gears and shuffle them onto whatever weapon or armor you’re currently running.
Where Abyss Gears Come From
Abyss Gears show up from a handful of reliable sources rather than one magic farm:
- Unique weapons and armor that come pre-loaded with a signature gear.
- Quest and challenge rewards.
- Treasure chests out in the Abyss.
- Back Alley Shops, which rotate their stock.
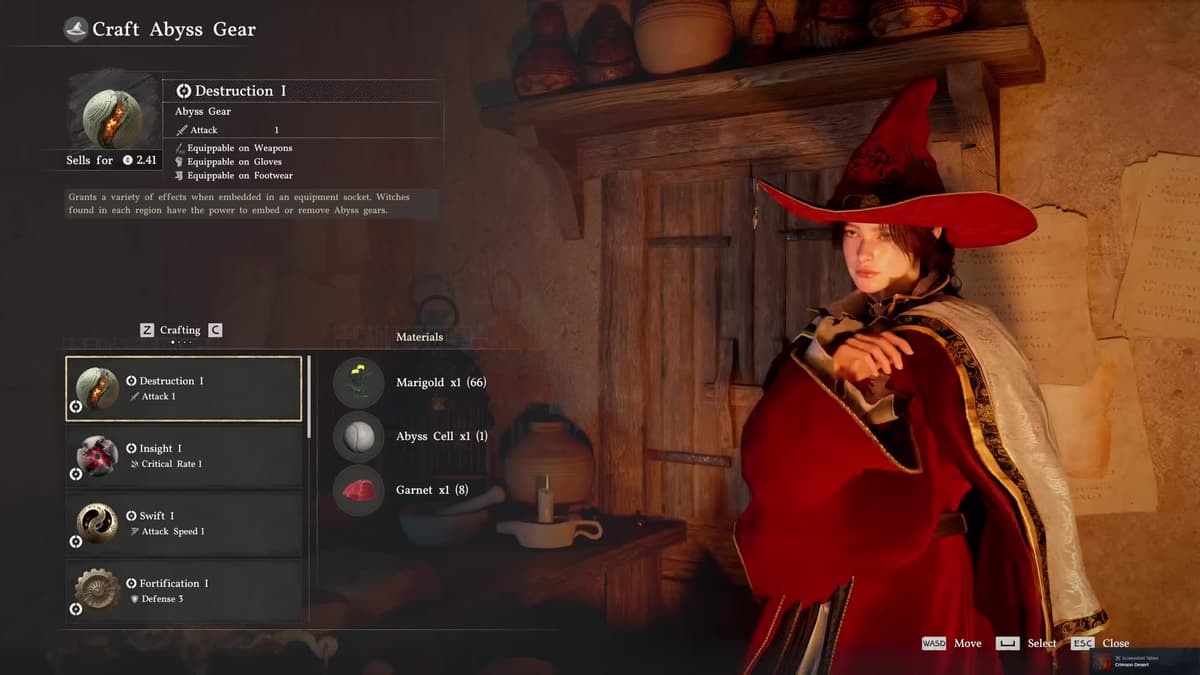
- Crafting them directly at a witch from materials (Marigold, Abyss Cells, Garnet, and the like).
Once you’ve built up a backlog, your next step is heading to the witch for extraction and synthesis so you can turn a pile of low-tier gears into a few high-tier ones.
Upgrading Abyss Gears: Synthesis vs Fusion
Abyss Gears come in tiers, I, II, III, and Greater, and there are two ways to push them up, both done at the witch:
- Synthesis – combine two identical gears of the same tier to guarantee one of the next tier up. This is the safe, predictable route.
- Fusion – combine different gears for a randomized result. It’s a gamble: you might roll up a tier, you might not.
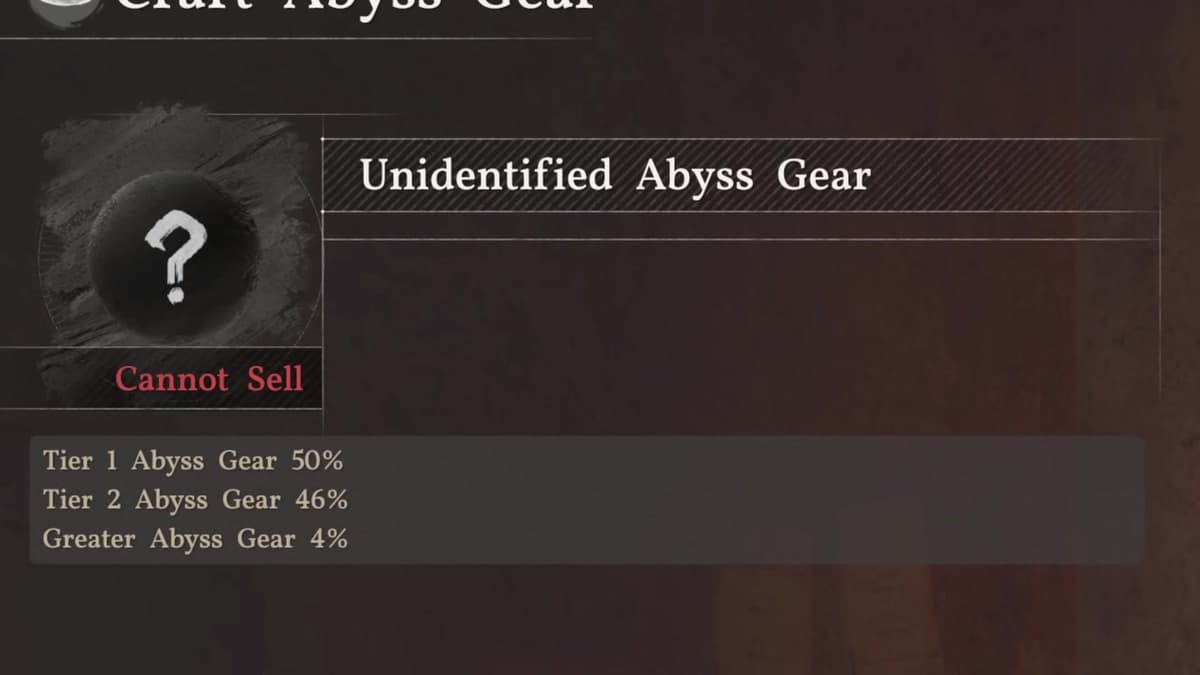
That screen is the part that bit me early. When you fuse mismatched gears, the game shows you the odds, in that example 50% for a Tier 1 result, 46% for Tier 2, and just 4% for a Greater Abyss Gear. If you want a specific gear at a specific tier, synthesis (matching pairs) is far less heartbreaking than gambling on fusion.
Greater Abyss Gears & the Durability Catch
Greater Abyss Gears are the strongest tier by a wide margin, but here’s the catch the menus don’t shout at you: Greater gears have durability and break. They’re consumed by use, and a single Greater gear can be chewed up over a tough fight or two. This is the real “cooldown” you manage on the Abyss Gear side, it’s not a timer, it’s a finite-use resource.
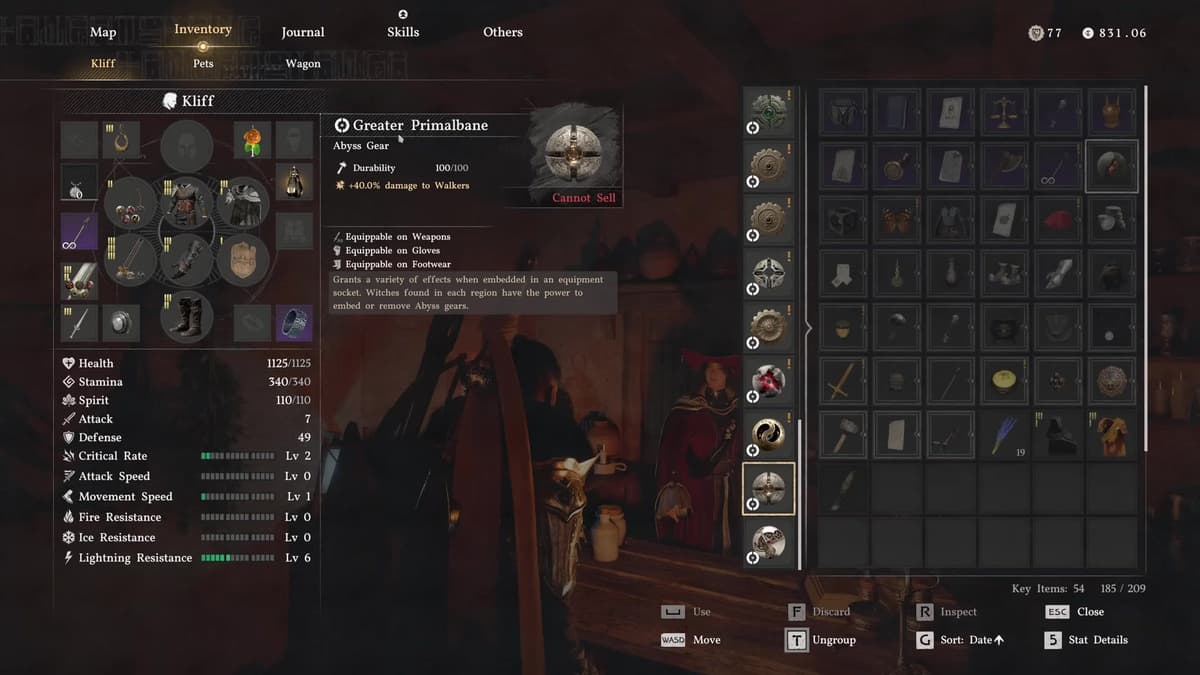
Because of that, I treat Greaters like ammo, not permanent upgrades. I save them for content where the extra damage actually matters, hard bosses and dangerous Abyss runs, and fall back to stable Tier II/III gears for routine farming so I’m not burning a rare Greater on trash mobs.
The Gear I Actually Keep Using
A few specific Abyss Gears and pieces stayed in my rotation because they directly improve damage, survivability, or resource efficiency.
Ator’s Orb – Homing Heavy-Attack Damage
Ator’s Orb is a weapon-skill Abyss Gear, not a standalone weapon. Once it’s socketed, it summons orbs that track nearby enemies after a short delay and deal damage on impact, effectively turning a heavy attack into a ranged, homing threat.
Why I rate it:
- It lets you keep distance while still dealing weapon damage.
- The homing effect is great when the arena is chaotic or visibility is bad.
- It pairs well with any stat-boost gears that bump heavy-attack or critical damage.
The common mistake is overcommitting: the orbs tempt you to stand still and charge, but you still need safe windows. Use your guard and stamina gears to buy those windows.
Demeniss Royal Guard Shield – High-End Guard Utility
The Demeniss Royal Guard Shield is one of the better defensive shields I’ve found, with strong guard stats and good socket potential for guard- and counter-focused builds. It’s sealed away underground in a hidden chamber beneath the Church of East Demeniss, south-east of the Golden Plains on the eastern side of Demeniss.
To grab it you work through the church into the lower chambers, solve a short puzzle to open the sealed area, and loot the shield from the chamber at the end. Slotted with guard-stamina and counter-boosting Abyss Gears, my block strings last noticeably longer and I can trade hits with “mighty” enemies while setting up counter windows.
Scorchflame Set – Fire/Heat Resistance Workhorse
The Scorchflame armor set (sometimes listed as Scorchflame Knight) is my go-to whenever the game leans into heat or fire damage. It significantly improves fire resistance and makes lava-adjacent areas and flame-using bosses far more manageable.
The pieces are scattered around Demeniss, the plate armor sits near the Golden Trading Post behind a rotating door, while other parts are tucked behind waterfalls and in hidden rooms north and west of Demeniss. Don’t stop at one or two pieces: the set really comes online once you’re wearing several parts, and you can socket offensive Abyss Gears into it so you’re not just tanky but still lethal in fire-heavy zones.
FinalBoss // Gear
Level up your setup
01Top-rated gaming headsetson Amazon→02High-refresh gaming monitorson Amazon→03Gaming chairson Amazon→04Discounted game keyson Kinguin→
Affiliate links · As an Amazon Associate, FinalBoss earns from qualifying purchases.
Want to Level Up Your Gaming?
Get access to exclusive strategies, hidden tips, and pro-level insights that we don't share publicly.
Ultimate Guide Strategy Guide + Weekly Pro Tips
Cooldown Tricks: Dragon, Mech & Beyond
Good Abyss Gears are half the story. The other half is learning how Crimson Desert lets you cut down the long cooldowns on its biggest abilities. These are the ones that changed how I play.
Narima’s Horn & Dragon Claw Horn – Resetting the Black Star Dragon
When you summon the Black Star (Blackstar) dragon, it stays out for about 10 minutes and then disappears, and after that you’re looking at a 70-minute cooldown before you can call it again. That’s fine for casual roaming but brutal if you want the dragon as part of a hunt route.
There are two consumables that deal with it:
- Narima’s Horn – instantly and completely resets the dragon cooldown. It’s crafted at a witch from Dragon Claw Horn x3, Stalactite x1, and Feather x2. The recipe itself is a random Crafting Blueprint you can pick up from your Greymanes’ exploration missions.
- Dragon Claw Horn – knocks 10 minutes off the active cooldown each, so seven of them fully reset it. You earn them by sending Greymanes on missions (the Tinkerton Dig Site run is a known source) or as drops from Medium Bags.
Because Narima’s Horn eats three Dragon Claw Horns plus materials, I don’t burn it on every skirmish. I stockpile a few and save them for planned boss or resource runs where I want the dragon on call back-to-back.
ATAG Mech – Instant Cooldown Reset Items
The ATAG mech is unlocked later in the story and becomes one of the best mobility-and-combat tools in the game, but it also goes on cooldown after you use it. What the game doesn’t advertise is that you can craft mech-specific items, think of them as recharge parts or service modules, that reset that cooldown so the mech is ready again immediately.
How I work it into a session:
- Unlock the mech upgrade line via its vendor after the relevant story mission.
- Check the recipes tied to ATAG maintenance and cooldowns.
- Farm the listed materials (largely metallic ores and mech salvage).
- Craft a small stack of cooldown-reset items to carry.
The effect is the same idea as Narima’s Horn but for your mount: hop in and out of the mech repeatedly during a route, or use it for back-to-back tough fights without being punished by the timer. Just track how many resets you have left so you don’t waste them on trivial travel.
Abyss Gears for Stamina, Ammo & Food Efficiency
Beyond the flashy stuff, some quieter Abyss Gears massively change how often you restock the basics:
- Stamina-reduction gears – make dodging, sprinting, and skill usage feel almost free; crucial if you lean on guard skills.
- Guard-focused gears – perfect on a shield like the Demeniss Royal Guard; you hold block longer and eat more hits without a guard break.
- Infinite Arrows – a real Abyss Gear with a chance not to consume arrows (roughly 60% at the higher tier), turning bow builds into near-“battery” playstyles.
- Gourmet – boosts food effects so your buffs and healing stretch further, cutting consumable churn.
All of these come from extraction and then synthesis or fusion at the witch. The trick is to be intentional: decide which resource you hate running out of, stamina, ammo, or buffs, and build your sockets around that.
Putting It Together: A Practical Abyss & Cooldown Setup
Here’s roughly how my current “efficient” setup looks, combining everything above:
- Weapon sockets: Ator’s Orb for homing heavy-attack pressure, plus a stat-boost gear (crit or attack speed) and a Bane that matches what I’m fighting.
- Shield: Demeniss Royal Guard Shield with guard-stamina and counter-boosting gears.
- Armor: a general combat set, swapped for Scorchflame in fire-heavy zones, with defensive passives and a damage gear or two.
- Greaters: kept in reserve and only socketed for hard fights, since they break with use.
- Mount: ATAG mech with a couple of cooldown-reset items in the bag; a horse for low-stakes travel.
- Summon: the Black Star dragon, with Narima’s Horns and Dragon Claw Horns saved for planned sessions.
On a typical session I’ll restock crafting materials, visit the witch to extract and re-socket anything new, craft a few cooldown resets if I’m low, then run a chain of bosses or routes with the dragon and mech essentially “always available.”
Final Takeaway: Build Around Loops, Not Just Loot
If there’s one lesson I wish I’d internalized earlier, it’s that Crimson Desert’s Abyss system is about loops, not isolated items. The witch isn’t just a vendor; she’s the engine that lets you extract, synthesize, and re-socket on demand. Ator’s Orb, the Demeniss shield, and the Scorchflame set aren’t just collectibles; they’re anchors for damage, guard, and element-proof builds. Narima’s Horn and ATAG cooldown resets aren’t quirky recipes; they’re what turn the dragon and mech from rare treats into regular tools.
Once you start thinking in terms of those loops, socket, extract, upgrade, reset cooldowns, the game’s hardest content gets a lot more manageable, and your downtime between the fun moments shrinks dramatically.