Hades 2: Complete the Moirai Prophecies & Reach the True Ending
Game intel
Hades II
Battle beyond the Underworld using dark sorcery to take on the Titan of Time in this bewitching sequel to the award-winning rogue-like dungeon crawler.
Why this matters (and how I finally did it)
After spending a week obsessing over the Moirai chain, I finally pieced together every trigger, conversation, and the exact Engraved Pin sequence that unlocks Hades II’s true ending and the “A Time for All” achievement. I failed this final sequence three times before it clicked, mostly because of avoidable mistakes-bringing a familiar, walking into a non-combat room, and accidentally healing. This guide is the exact route I now use, with the pitfalls called out so you don’t repeat them. If you enjoy deep game guides like this, you might also want to check out our complete Simoso optimization guide for Expedition 33.
At-a-glance prerequisites (do this first)
- Finish a full run by defeating Cronos once (the “normal” ending/credits).
- Reach both routes: the Underworld path (Erebus → Oceanus → …) and the Surface path (up through Ephyra/Olympus).
- Meet and fight Prometheus on the Surface several times.
- Grow relationships with Moros, Chaos, Cronos, Hecate, Prometheus, and Heracles (Nectar is your workhorse; Ambrosia when available).
- Obtain Moros’s keepsake, the Engraved Pin, and understand how it works.
- Have the flexibility to swap keepsakes mid-run at region rest areas.
Estimated time: If you’ve already beaten Cronos, expect 2-5 more runs depending on how quickly the six relationship beats trigger and whether Prometheus delivers the right line. The final Engraved Pin sequence takes ~10-15 minutes once you reach Oceanus.
Step 1 – Unlock the new prophecy after your first clear
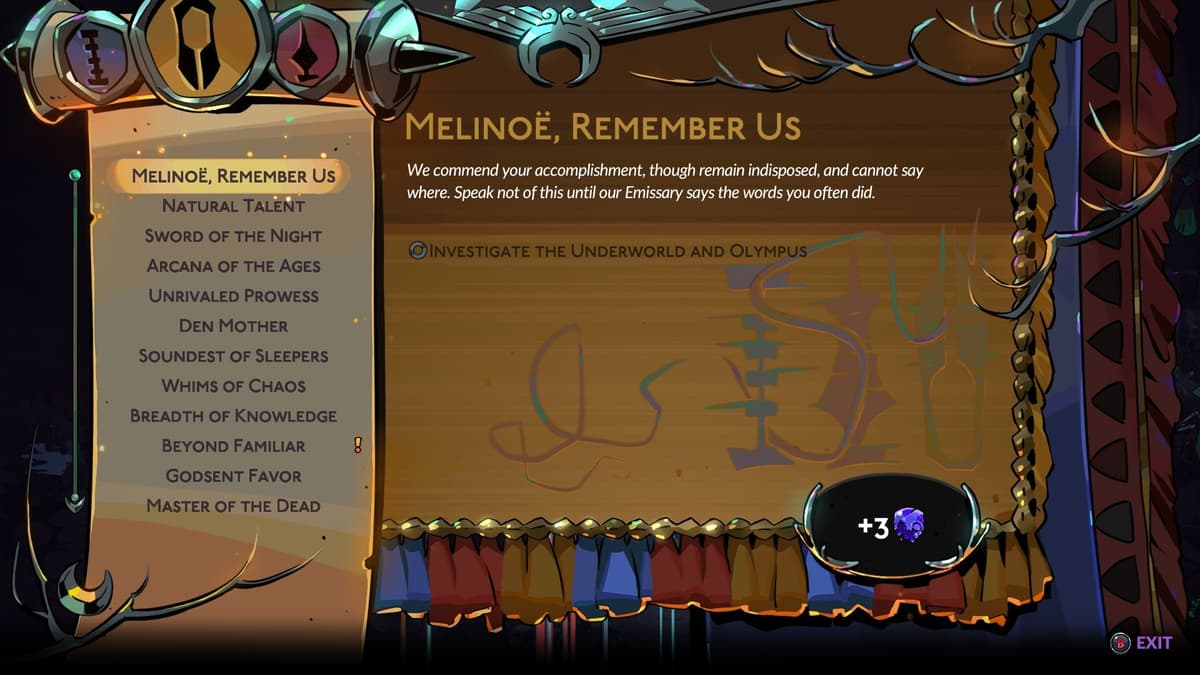
Once you beat Cronos and roll credits, return to the Crossroads and check the Fated List: Crossroads → Fated List of Minor Prophecies. The early prophecy “Melinoë, Help Us” will be replaced by “Melinoë, Remember Us.” If you don’t see it immediately, talk to everyone at the Crossroads (especially Moros) and then check the list again after your next run.
What finally worked for me was doing one short Surface run and one short Underworld run post-credits; the new entry appeared the next time I spoke to Moros and checked the list.
Step 2 – “Melinoë, Remember Us” (explore both sides and talk to Moros)
This stage is mostly about showing progress on both routes and keeping Moros in the loop. Do at least one run that reaches the Surface hubs and one that pushes into Oceanus on the Underworld route. Each time you return to the Crossroads, talk to Moros first, then check the Fated List. Offer him Nectar whenever possible—he’s not picky, and his affinity gates later steps.
Common mistake: I wasted two runs ignoring Moros’s dialogue prompt. If his icon appears over his head, talk to him before you do anything else; some flags simply won’t flip otherwise.
Step 3 — “Melinoë, Seek Us” (strengthen six relationships)
Now the prophecy gets explicit: you must deepen your bond with six characters tied to the Fates. For most, it’s Nectar → more conversations → Ambrosia when available. The exception is Prometheus, whose boss intro needs to reference the Moirai. Here’s how I knocked each one out:
1) The One Who Is Our Emissary — Moros
Location: Crossroads. I offered Nectar every time I had one, and never skipped his dialogue. He gave me the Engraved Pin keepsake as the relationship progressed; you need this for the finale. If you’re short on Nectar, prioritize Moros over others until the Pin is yours.
2) The One Who Made the World — Chaos
Location: Chaos Gates (can appear in either route). Offering Nectar to Chaos is straightforward; accept the entry penalty to their realm and grab any boons while you’re there. I found Chaos spawns more reliably once I’d seen both routes in a run or two, but it’s RNG—don’t stress if it takes a few attempts.
3) The One Who Banished Us — Cronos
Location: The rest area between Erebus and Oceanus on the Underworld route. There’s a unique interaction in that liminal spot. Bring Nectar and hear him out. I expected this to require another boss kill, but the conversation in the inter-region rest area did the trick once I had cleared the game previously.
4) The One Who Trained You — Hecate
Location: Crossroads. Hecate loves consistency; visit her after runs, offer Nectar, and don’t skip practice or her dialogue. For me, the flag popped after a couple of Nectar gifts and a few post-run check-ins where she commented on my progress.
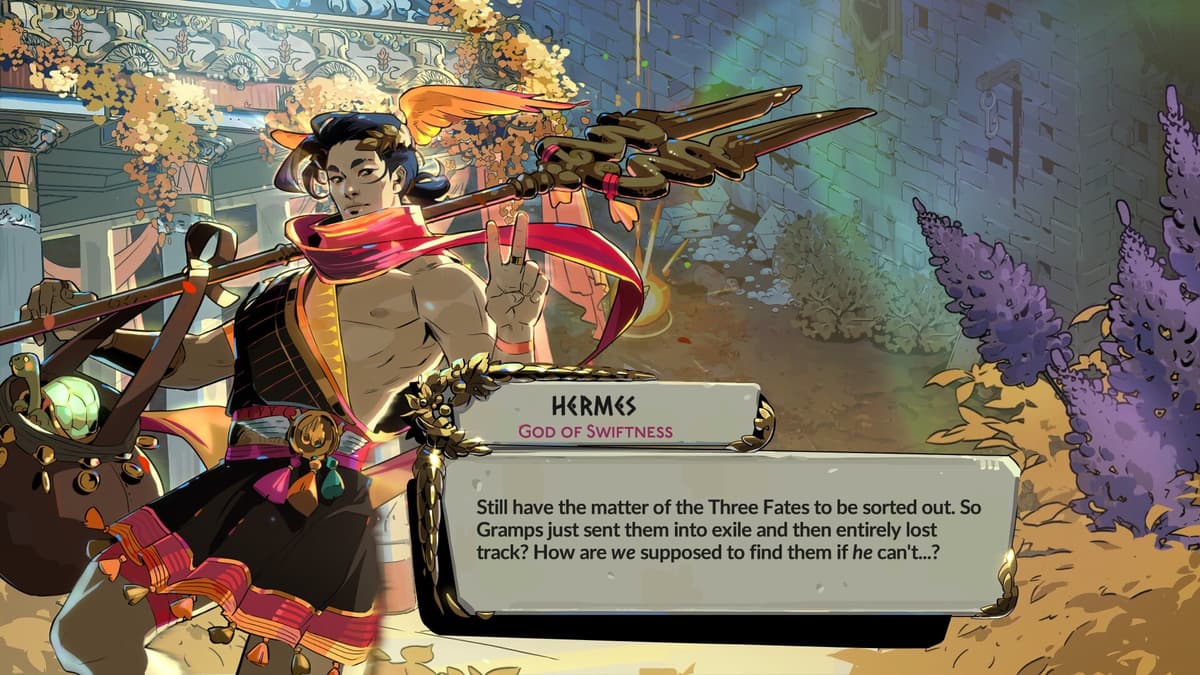
5) The One Who Rebels Against the Gods — Prometheus
Location: Surface route (Olympus path). You must fight him multiple times until his intro mentions the Moirai. This took me four fights. If he doesn’t reference them, keep pushing Surface runs and re-engage him. Nectar helps, but the key is that specific line in his boss introduction.
6) The One Who Works for the Gods — Heracles
Location: Surface route, often in the City of Ephyra but can appear elsewhere topside. Offer Nectar and talk to him whenever he shows up. His spawns felt streaky for me; I did two Surface-leaning runs to see him twice in one night and finish his entry.
Tip: I kept a mental rotation—start one run Underworld-bound (for Cronos rest area, Oceanus progress), then one Surface-bound (Prometheus/Heracles), always beginning each session with a Moros/Hecate check-in at the Crossroads. This pacing advanced all six without grinding a single route to death.
Finale — The Engraved Pin sequence in Oceanus (do this exactly)
Once the “Seek Us” stage is complete, the prophecy’s wording points you to Oceanus with a very particular ritual. Here’s the exact sequence I use that reliably triggers the Moirai reveal and the true ending:
- Equip another keepsake for Erebus if you want, then swap to the Engraved Pin at the rest area between Erebus and Oceanus:
Fountain Room → Keepsake Stand → Engraved Pin. Do not forget this swap. - In Oceanus, you must trigger the Pin’s 0 HP heal in three consecutive combat chambers. That means your health hits 0, the Pin heals you, and you then finish the room.
- After the third successful trigger, intentionally die in the next combat room without letting the Pin heal you again.
How I execute it cleanly:
- Pick standard combat rooms only. Always choose doors with enemy icons. Avoid shops, NPC rooms, fountains, fishing, Chaos gates, trials—anything non-combat breaks the “consecutive” chain.
- Clear most enemies, then leave two or three weak ones alive. Stand in hazards or let them hit you until you drop to 0 HP and the Pin procs. As soon as it does, delete the stragglers with a prepared burst (cast loaded, Omega attack charged, or a call ready).
- Repeat this for two more combat rooms in a row. If you accidentally enter a non-combat room, the chain is broken; you’ll need to restart the sequence (finish the run or bail and try again).
- On the room after your third Pin proc, die deliberately without triggering the Pin—let enemies finish you before the Pin can save you. If done right, you won’t return to the Crossroads; instead, the Moirai will appear.
What finally worked for me was leaving my familiar at home. My cat kept sniping the last enemy before my 0 HP trigger, invalidating the room. Before starting the run, unequip your familiar at the Crossroads so there’s no stray damage messing up your timing.
FinalBoss // Gear
Level up your setup
01Top-rated gaming headsetson Amazon→02High-refresh gaming monitorson Amazon→03Gaming chairson Amazon→04Discounted game keyson Kinguin→Affiliate links · As an Amazon Associate, FinalBoss earns from qualifying purchases.
Want to Level Up Your Gaming?
Get access to exclusive strategies, hidden tips, and pro-level insights that we don't share publicly.
Ultimate Guide Strategy Guide + Weekly Pro Tips
Build and setup tips for the Oceanus sequence
- Favor burst on demand. Fast specials or casts that can instantly remove 1-2 enemies make post-proc cleanup safe. Fine-tuning your build in a roguelike is a lot like modding a survival game to perfection — every small tweak matters. I had the easiest time with a quick special-focused setup.
- Avoid passive healing and extra revives. Don’t take boons or Arcana that auto-heal or grant additional death-defy effects; they can either prevent you from hitting 0 HP or “save” you instead of the Pin.
- Keep max HP moderate. Huge health pools make it tedious to dip to 0 safely. I skipped max-HP boons and stuck to damage and control.
- Carry a panic button. A stored Omega cast or god gauge burst ensures you don’t stall post-proc and accidentally die before clearing the room.
- Know Oceanus hazards. Water jets and puddles are predictable ways to chip yourself down without risking a sudden spike from elite enemies.
Common mistakes I made (so you don’t)
- Forgetting to swap the keepsake at the Erebus → Oceanus rest area. I now pause at the fountain and say out loud “Pin on,” then use
Interact → Keepsake Stand → Engraved Pin. - Entering a shop/NPC room during the sequence. If it’s not a combat icon, don’t take it. One detour resets the chain.
- Bringing a familiar. They will finish off low-HP enemies at the worst time. Leave them behind for this run — companion AI in games can be as unpredictable as navigating Hogwarts Legacy’s hidden areas.
- Overhealing or picking up a passive regen boon. If you can’t safely reach 0 HP, the Pin never procs and you waste rooms.
- Underestimating Prometheus’s requirement. I had to fight him multiple times until he referenced the Fates; Nectar alone didn’t count.
Troubleshooting weird edge cases
Prometheus won’t mention the Moirai: Keep doing Surface runs. If you’re torn on route choice, commit to Surface until you’ve heard the line. It eventually triggers through repeated encounters.
Cronos interaction missing: Make sure you visit the rest area between Erebus and Oceanus and speak to him there post-credits. If he isn’t present, try another Underworld run and return to that inter-region room again.
Pin not proccing: You either aren’t at true 0 HP or another effect is saving you first. Drop passive healing, remove extra death-defiance-like effects, and ensure your last hit takes you to 0 in-combat.
Chain breaks unexpectedly: You probably stepped into a non-combat room. Reset the sequence by reaching Oceanus again, or finish the run and try next time.
Run flow I recommend (from start to reveal)
- At the Crossroads: talk to Moros and Hecate; equip any keepsake you want for Erebus; leave familiar unequipped. Start run:
Crossroads → Start Run. - Erebus: play normally. Don’t worry about the Pin yet.
- Rest area (Erebus → Oceanus): swap to Engraved Pin. Take a breath and plan three straight combat rooms.
- Oceanus: do the three Pin procs in a row (combat rooms only), then die intentionally in the next combat room without the Pin saving you.
- Watch the Moirai scene, secure the true ending, and enjoy the achievement “A Time for All.”
Final encouragement
This chain feels finicky until you align the moving parts: six relationships, a specific boss line, and a strict Oceanus ritual. Once I stopped bringing a familiar, avoided non-combat rooms, and kept my build lean and bursty, it fell into place on the very next run. If you’ve checked off the bonds and you respect the Engraved Pin steps, the reveal triggers reliably. Stick with it—you’re closer than you think. Looking for your next challenge after Hades II? Browse our cutest Pokémon rankings for something lighter, or dive into more of our gaming guides below.