Marathon: How to Complete Order/Chaos – Safe Dire Marsh One-Run Route
Game intel
Marathon
Marathon Recompiled is an unofficial PC port of the Xbox 360 version of Sonic the Hedgehog (2006) created through the process of static recompilation. The port…
Why Order/Chaos Is So Easy to Fail (And How This Guide Fixes It)
After spending a good evening’s worth of runs bashing my head against the Order/Chaos contract in Marathon’s Dire Marsh, I finally pieced together a consistent, low-risk route. My early attempts all failed for the same reasons: I couldn’t find the right terminals, I underestimated the Security Commander drop, and I kept taking the most dangerous path across the map without realizing it.
Order/Chaos is a MIDA priority contract that demands you complete three objectives in a single Dire Marsh run:
- Hack the red terminal in the NuCaloric lab at South Complex.
- Kill the Security Commander that arrives and loot its credentials.
- Download data from a terminal in the Maintenance hangar at the south-west edge of the map.
If you die or extract early before doing all three, you restart the whole thing. I learned that the hard way more times than I’d like to admit. This guide walks you through exact locations, the Commander fight, and the safest south-hugging route I use now to clear it reliably, even solo.
What You Need Before Starting Order/Chaos
Order/Chaos unlocks once you’ve pushed a bit into early faction content (after the Cyberacme “Welcome to Tau City” style intro tasks). By the time Gantry hands this to you, Dire Marsh should already feel lethal, so going in with a plan matters.
Here’s what I run when I’m focused on this contract:
- Mid-range primary with decent ADS speed – something you can land headshots with against armored AI at medium range.
- Backup weapon with good ammo economy – pistol or SMG to finish off trash AI and conserve primary ammo.
- At least one med kit and a shield recharge – the Commander drop is where you’re most likely to take chip damage.
- 1–2 grenades – great for clearing the Commander’s adds if they stack on cover.
- Free or low-cost kit – you’re pathing through AI-heavy territory; don’t bring your most precious experimental build for a contract run.
Dire Marsh punishes overconfidence. You don’t actually need insane DPS for this contract, but you do need control, cover usage, and map awareness.
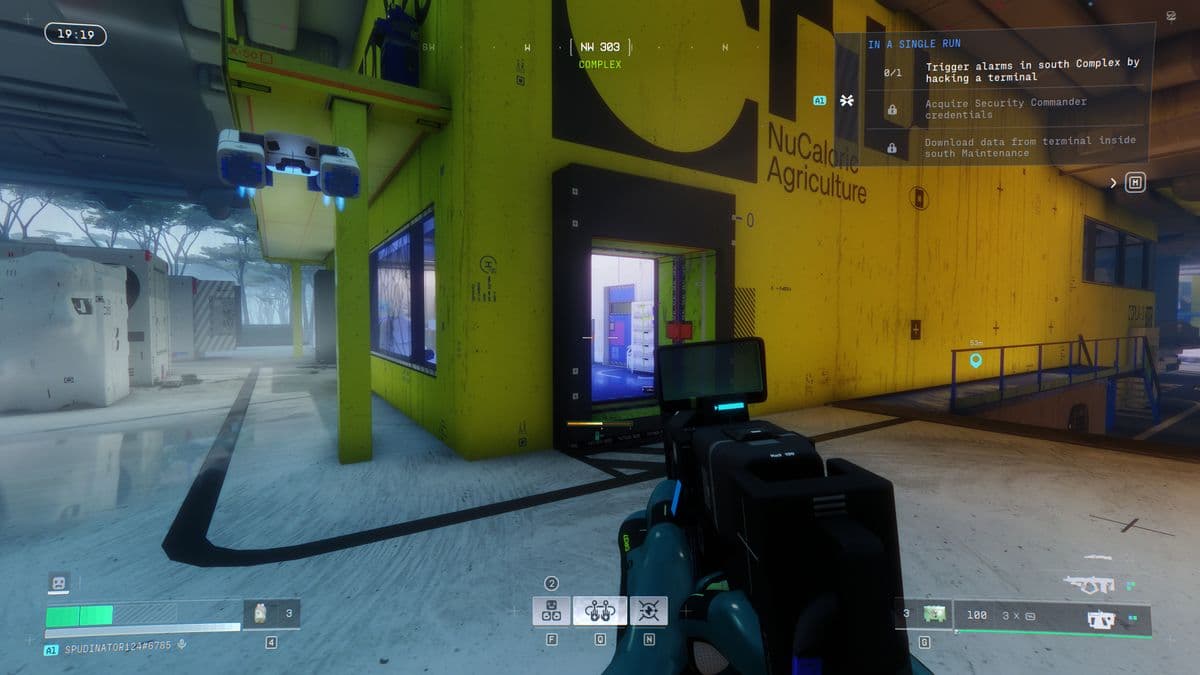
Step 1 – Reach the NuCaloric Lab Red Terminal at South Complex
Your first objective is at Complex on the east side of Dire Marsh, specifically the NuCaloric lab at the southern end of that POI.

The breakthrough for me was realizing I didn’t need to plow through the middle of Complex at all. The game never tells you this, but the safest approach is to stick to the eastern swamp edge and then cut in only when you’re level with the lab.
Here’s how I path it now:
- From spawn, orient yourself towards Complex on the east side of the map.
- Instead of going straight for the central buildings, rotate wide to the southeast and follow the swamp edge northward.
- Watch for the yellow NuCaloric lab structure on the south end of Complex, right on the eastern side overlooking the swamp.
- Head inside and look for the room marked “PI X-3” – the red UESC-style terminal you need is in there.
That “PI X-3” label is what finally made me stop running circles. If you’re wandering through multiple labs and offices, you’ve probably gone too far into central Complex. Backtrack towards the swamp-facing yellow building.
Once you’ve found the red terminal:
- Clear the room and nearby hallway of any AI first. You don’t want stray units flanking you once the Commander arrives.
- When ready, interact with the red terminal to start the hack and trigger the alarms.
As soon as you do this, you’re locked into the trickiest combat part of the contract.
Step 2 – Survive the Security Commander Drop and Grab Credentials
After the hack, a red UESC dropship comes in outside the NuCaloric lab and spawns a Security Commander plus reinforcements. My early failures came from greed: I tried to melt the Commander instantly and just got shredded by the adds.
What finally worked consistently was treating it like a small-scale raid encounter:
- Move to cover facing the dropship zone – I like using the lab doorframe or nearby containers so I can duck in and out.
- As soon as AI land, focus the minions first. They’re easier to kill and remove most of the incoming damage.
- Use grenades or wide-angle abilities if two or three cluster behind the same piece of cover.
- Once the adds are thin, shift to headshots on the Commander. Its health pool is chunky, but it goes down reliably to disciplined mid-range fire.
- Don’t overpeek – if your shields crack, fall back into the lab, heal, and re-peek. There’s no timer pressure here; surviving is more important than style.
When the Commander dies, your quest item is not in a loot window. Don’t make my mistake of sprinting off, assuming it auto-looted.

Instead, do this:
- Walk to where the Commander’s body fell.
- Look for a yellow quest icon on the ground – that’s the credentials.
- Interact to pick them up; only then is the second objective actually complete.
I once did a perfect clear, rotated to Maintenance, finished the final terminal… and realized the contract didn’t complete because I never grabbed that yellow icon. Don’t repeat that run.
FinalBoss // Gear
Level up your setup
01Top-rated gaming headsetson Amazon→02High-refresh gaming monitorson Amazon→03Gaming chairson Amazon→04Discounted game keyson Kinguin→Affiliate links · As an Amazon Associate, FinalBoss earns from qualifying purchases.
Step 3 – Reach the Maintenance Hangar Terminal in the Southwest
With the credentials secured, your last task is to download data from a terminal in Maintenance at the southwest edge of Dire Marsh.
The confusing part is that Maintenance has an obvious control room that looks like the kind of place a mission terminal would be. I lost an entire run searching that room. The actual objective is in the hangar area at the far south of Maintenance, right where the doors open out towards the swamp and the bottom of the map.
When you’re in Maintenance:
- Head towards the southernmost hangar doors, not the control room above.
- Look for the terminal under the walkway in the center of the hangar space.
- Interact with it to start and finish the data download.
Once the download completes, the Order/Chaos contract is done. You do not have to extract alive for credit, though obviously keeping your gear and loot is a nice bonus if you can still reach an exfil.
Want to Level Up Your Gaming?
Get access to exclusive strategies, hidden tips, and pro-level insights that we don't share publicly.
Ultimate Guide Strategy Guide + Weekly Pro Tips
The Safest One-Run Route: Hug the Southern Swamp Edge
Order/Chaos fails most often not in the fights, but on the travel between objectives. Complex, AI Uplink, and Canal can all turn into messy firefights with both AI and players if you march straight through the middle.
The route that finally gave me consistent clears looks like this:
- Start → Complex (NuCaloric)
Use whatever spawn you get to rotate towards the east side of the map. Approach Complex from the southeast and follow the swamp edge north to the yellow NuCaloric lab. Hack the red terminal, kill the Commander, grab credentials. - Complex → Maintenance via the deep south
Once you’re done at NuCaloric, head directly south out of Complex back towards the swamp. Avoid cutting west through central Complex – that’s where I ran into most player squads. - Follow the bottom of the map west
From the swamp south of Complex, hug the southern boundary of the map, skirting below AI Uplink and Canal. Stay low and watch for patrols; you can usually bypass or quickly disengage from AI here compared to the higher-density interiors. - Enter Maintenance from the south or southwest
When you reach Maintenance, approach via its southwest hull / hangar doors instead of coming in through the more trafficked central entrances. - Hit the hangar terminal and decide on extraction
Interact with the under-walkway terminal, complete the download, then decide if you have time and resources to rotate to an exfil. If the lobby’s hot or you’re low on meds, remember: the contract is finished the moment that download completes.
This “southern crawl” route avoids most high-risk POIs while still keeping your objective timings tight. When I stopped greedily detouring to loot Intersection or central Canal, my success rate shot up.
Common Mistakes That Cause Order/Chaos to Fail
Here are the pitfalls I either personally fell into or watched squadmates repeat:
- Missing the yellow credential drop
Again: the Commander’s credentials are a yellow icon on the ground, not in a loot window. Always double-check the drop zone before you leave Complex. - Searching the wrong areas in Maintenance
Don’t waste time in the control room. The final terminal is in the hangar, under the walkway, at the southern edge of the POI. - Fighting every AI and player you see
This is a contract run, not a high-risk loot raid. Avoid central Complex, AI Uplink, and Canal interior fights whenever you can. - Rushing the Commander
Greedy peeks will get you killed. Clear adds, use cover, and take the Commander down with controlled bursts and headshots. - Forgetting it must be one run
If you finish only part of the objectives and extract, you’re not “saving progress” – you’ll redo all three next time. Plan the whole route before you drop.
Rewards and Why Order/Chaos Is Worth Doing
When you finally string all three objectives together in a single run, Order/Chaos pays out reliably with:
- 2× Enhanced Ammo Crates
- 3× Proximity Sensors
- 1× Heat Grenade
- 1500 Credits
- 3× Unstable Lead
More importantly, it pushes your MIDA faction progression forward, unlocking the next wave of rebel-flavored contracts and gear. Once I had a repeatable way to do this, it stopped feeling like an impossible choke point and became a quick, focused objective run I could slot between riskier raids.
If you follow the steps here — NuCaloric red terminal → Commander kill and yellow credentials → southern swamp route → Maintenance hangar terminal — you should be able to turn what used to be a frustrating, multi-hour scavenger hunt into a clean, single-run clear. Stick to the southern edge, respect the Commander drop, and don’t let the map bait you into unnecessary fights. If I could turn my string of failed attempts into a reliable farm, you can absolutely do the same.