
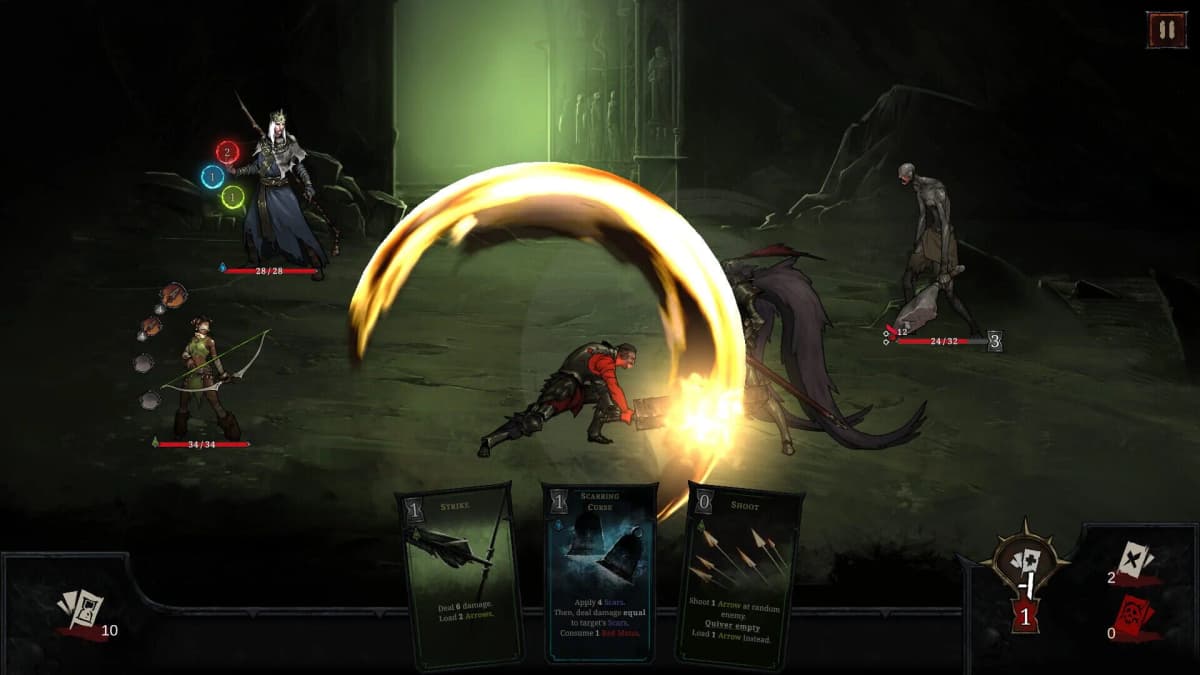
Cards, party members, and dungeon nodes give Shards of Order a familiar RPG structure, but its early combat runs on a very different rhythm. Every card, redraw, and movement step advances a shared Time Counter that also brings enemies closer to acting. The safest beginner plan is to build three-card sequences from cheap plays, take the free draw, eliminate the enemy whose next action causes the biggest problem, and keep the shared deck lean enough that every hero can contribute.
For a cautious first clear, allow roughly 30-45 minutes if you are reading card text and enemy intents carefully. The opening hours reward planning far more than speed: a single expensive redraw, an unnecessary revive, or one poor unlock can affect the entire party because your deck is shared.
Table of Contents (25)
Understand the Shared Deck Before You Unlock Anything
Every hero draws from one shared card pool. Cards unlocked through a character’s progression and cards added by equipment become available to the team unless a class or keyword restriction says otherwise. That makes early deckbuilding a party-wide decision rather than a personal build choice.
The immediate consequence is simple: a weak, expensive, or overly narrow card can show up in any hero’s hand at the worst possible time. A useful low-cost attack, shield, heal, cleanse, or setup card can do the opposite by giving multiple characters a productive play when the enemy countdown is tight.
- Prioritize cards that work in several situations. Cheap single-target damage, protection, cleansing, and reliable debuffs are valuable because the whole party can draw them.
- Treat gear as a deckbuilding choice. An item that adds a useful shield card can be more valuable than a small stat increase because it improves the shared pool every fight.
- Watch for deck bloat. Too many situational cards reduce the chance of drawing the cheap tools that keep your Time Counter under control.
- Use respec early if needed. Skill points can be respecced from the start, so a poor early unlock does not need to define the campaign.
Common trap: evaluating a card only by how strong it looks on the hero who unlocked it. In practice, ask whether you would be happy to draw that card on any member of the party while an enemy is about to act.
The Time Counter Is Your Real Combat Budget
Combat flows continuously rather than waiting for alternating turns. Each card has a time cost, movement costs 1 time per step, and drawing cards can cost time as well. Whenever you spend time, every enemy countdown moves closer to its next attack, buff, or debuff.
Read the number next to each enemy before committing to a card. An enemy at 2 is an immediate concern if your next play costs 3 time. That play may still be correct, but it should be a deliberate choice: either the card kills the threat, prevents its action, or you have enough defense to absorb what follows.
Build Every Hand Around the Three-Card Free Draw
The core early-game loop is reaching three played cards, then drawing for free. Before that threshold, a redraw is costly; the redraw timer begins at 4 time in the opening game. Paying that cost early can hand several enemies the time they need to attack.
- Scan enemy countdowns and choose the enemy you must answer first.
- Play one cheap card, ideally costing 1-2 time.
- Play a second cheap card that adds damage, defense, positioning, or control.
- Play a third efficient card to reach the free-draw threshold.
- Draw at 0 time, reassess the countdowns, and repeat the loop if the battlefield remains stable.
This is why cheap cards matter so much at the start. Three 1-time cards can refresh your hand while leaving the enemy schedule manageable. A powerful 4- or 5-time card may be worth using to secure a kill or stop a major action, but repeatedly leaning on high-time plays leaves the party exposed and forces costly redraws.
Use This Opening Sequence in Your First Fights
Pause mentally before the first card. The opening sequence usually determines whether you control the fight or spend the rest of it recovering from enemy buffs and damage.
1. Read the Enemy Countdown Bar
Find the smallest countdown number first. Then check what that enemy is preparing to do. A fast buff, debuff, or heavy attack deserves more attention than a slower basic attack from a tougher enemy.
2. Pick the Target That Changes the Fight
Early packs are safest when you remove the enemy that improves its allies or disrupts your party. In a group containing a buffer, a bruiser, and weaker enemies, focus the buffer if you can kill or heavily pressure it before its next action. If the buffer cannot be removed in time, shift to mitigation, positioning, or a disable rather than spending a full hand chasing a target that will act anyway.
- First priority: the enemy about to inflict a dangerous buff, debuff, or high-impact attack.
- Second priority: a fragile backline enemy you can remove cheaply before it gets value.
- Third priority: the highest-damage remaining threat.
- Last priority: a durable enemy whose next action is manageable and whose defeat requires inefficient time spending.
3. Spend Movement When It Prevents More Damage Than a Card
Movement costs 1 time per step, which is often cheap compared with taking a line, cone, or otherwise avoidable attack. Repositioning is especially strong when it lets your frontline protect a vulnerable ally while the rest of the party continues to pressure the priority target.
Do not move automatically, though. Each step still advances the enemy timers. Move to dodge a meaningful attack, improve target access, or protect a hero who would otherwise be knocked out. Avoid wandering around the arena while a dangerous enemy is already close to acting.
4. Finish the Three-Card Sequence Before Fishing for Answers
A hand that looks imperfect is usually better than an early paid redraw. Use your cheap attacks, protection, or positioning cards to reach three plays, then take the free draw. The game’s combat system heavily rewards this discipline because free draws preserve the time gap between your party and the next enemy action.
When to Revive a Knocked-Out Hero
A knockout is costly, but it is not an automatic reason to revive immediately. Revive costs increase, whether through time, resources, or the relevant card or ability, and an emergency revive can worsen the fight if it pushes multiple enemy countdowns into their next actions.
Your campaign and map progress persist after losses, so there is no need to treat every early death as a run-ending disaster. Checkpoints and continued progress give you room to recover, adjust your deck, and return with a better plan.
Revive Immediately When the Hero Changes the Next Few Seconds
- The revived hero can help kill the enemy about to act.
- The party needs that hero’s defensive, healing, or control card to survive the next countdown break.
- You have already stabilized the board and can afford the revive cost without giving enemies a devastating action.
- The hero’s return restores a key role, such as a frontline body protecting the rest of the team.
Delay the Revive When the Board Is Still Dangerous
- Several enemies are about to act and the revive will advance their countdowns.
- The revived hero would return directly into another dangerous attack pattern.
- The revive would stop you from completing a three-card sequence and taking a free draw.
- You can reduce the enemy count, shield the survivors, or reposition safely before bringing the hero back.
The practical rule: stabilize first, revive second. Use a revive as a tempo swing that lets the party regain control, rather than a reflexive response to every knockout.
Best Early Card Unlock Priorities
Your first unlocks should support the free-draw loop and give the shared deck answers to common problems. The strongest early pool is built from cheap pressure, one dependable finisher, and enough protection or utility to avoid losing a fight whenever the draw is awkward.
Take Cheap Single-Target Damage First
Cards costing 1-2 time that deal reliable single-target damage are the backbone of early combat. They help you hit the three-card threshold quickly, remove buffers before their next action, and finish weak backliners without spending a large chunk of the global Time Counter.
Early fights reward focused damage more consistently than broad, expensive effects. You rarely need to solve every enemy at once; you need to remove the one enemy that will make the next countdown painful.
Add One Reliable 3–4 Time Finisher
Keep one strong finisher with good scaling for enemies that are already near defeat, especially bosses or durable threats. The goal is to convert a costly play into a decisive kill, not to fill the deck with cards that repeatedly advance enemy timers.
A single finisher complements cheap attacks well: low-time cards create pressure and earn the free draw, while the finisher closes the window before a dangerous enemy can act again.
Unlock Defensive and Utility Tools Through Gear
Gear that injects shields, healing, or cleansing into the shared deck deserves serious attention. A shield card from an amulet, for example, can save a sequence where attacking would advance the Time Counter too far. These cards also make revive decisions safer because the party has more ways to stabilize before paying the revive cost.
Equip utility-card gear when it solves a problem you repeatedly face: incoming burst damage, debuffs, poor access to protection, or an inability to safely bridge the gap to the next free draw.
Character-Focused Early Unlocks Without Hurting the Shared Pool
Character progression still matters, but each choice should strengthen the entire combat plan. Build each hero toward a clear function while keeping their additions efficient enough for the shared deck.
Lev: Build Strength and Rage Efficiently
Lev works best as an early frontline damage dealer who can absorb pressure while building Strength and Rage. His strongest early choices support that scaling without demanding too much time.
- Commanding Shout: unlock this early. It grants 2 Strength to a selected character and gives Lev 1 Rage, helping both party damage and Lev’s own setup. Its Tier III upgrade spreads 1 Strength to all characters while still providing 1 Rage.
- Reckless Strike: an excellent Tier I pickup. It deals 6 damage and grants 2 Rage for only 1 time, making it ideal for cheap three-card sequences. With Vengeance equipped, it fills two of the weapon’s three maximum Rage stacks immediately.
- Crushing Blow: take this after establishing consistent Strength generation. Its base 8 damage for 2 time looks modest, but applying Strength twice gives it strong scaling when Commanding Shout and similar effects are online.
Lev’s unlock order shows the broader principle well: take cheap setup that creates value immediately, then add the payoff card once the setup is reliable.
Ayla: Secure Quiver Value Before Expensive Payoffs
Ayla’s early choices revolve around filling her Quiver and converting those arrows into damage efficiently. Favor cards that build that resource consistently and fit into low-time sequences. Arrow payoff cards become much stronger once the Quiver plan is functioning every fight; taking several expensive payoff cards too early makes the shared deck slower without guaranteeing that the necessary arrows are ready.
For the party, Ayla’s best contribution is dependable pressure that helps remove priority targets before they act. Keep her early additions focused on that job rather than loading the shared pool with cards that require a perfect setup hand.
Thade: Use Rot and Time Counter Effects to Control the Pace
Thade’s early card choices are valuable when they make enemy timing easier to manage through Rot and Time Counter-focused debuffs. Prioritize efficient effects that give the party breathing room or improve the value of your next sequence. The best early control cards are the ones you can use without giving up the free-draw loop.
Be careful with a deck full of costly setup effects. One well-timed debuff can prevent a dangerous action; several high-time cards waiting for the ideal combo can leave the party paying redraw costs and absorbing avoidable damage.
A Safe Early Route for the First Dungeon and Beyond
For an early clear, follow the recommended walkthrough node order and favor low-threat encounters first. Those fights give you time to learn enemy countdowns, collect basic gear with useful card injections, and test whether the shared deck has enough low-cost plays.
- Read the combat and control explanations before pushing deeper into the opening dungeon.
- Take safer encounters first to collect gear and establish a functional pool of cheap cards.
- Use early fights to identify which cards consistently sit dead in hand.
- Adjust the deck or respec before committing to more dangerous encounters.
- Unlock checkpoints as they become available so a difficult fight becomes a learning opportunity rather than a full reset.
During the escape from Shrike’s Lair and the first overworld stretch, pay attention to key items, Memory items, journals, and route information rather than rushing past them. Early exploration feeds directly into combat progress by opening paths, supporting checkpoint access, and giving the party more chances to improve its equipment-card package.
Fix These Early Combat Mistakes Before They Cost a Run
You Keep Getting Hit While Looking for Better Cards
You are probably redrawing before the three-card threshold. Play three efficient cards first whenever the board allows it, then take the free draw. If the board does not allow it, use defense, movement, or control to survive rather than paying time repeatedly in search of a perfect hand.
Your Party Feels Weaker After Leveling Up
The shared deck may have become bloated. Remove low-impact cards where possible, respec questionable unlocks, and return to a core package of cheap damage, one finisher, and practical utility. Every new card should earn its place across the party, not only in one hero’s ideal sequence.
You Cannot Keep Heroes Alive Long Enough to Revive Anyone
Shift target priority toward the enemy whose next action creates the most danger, even if it is not the largest enemy on screen. Then use 1-time movement, shields, and low-cost mitigation to survive the immediate countdown. Revives work after the enemy plan is under control; they rarely fix a board that is still escalating.
You Are Holding Expensive Cards for the “Perfect” Moment
Use a high-time card when it ends a threat, secures a boss phase, or prevents a major enemy action. Otherwise, keep cycling with cheap cards. Time is the resource that decides whether your party controls the fight, and expensive cards need to justify every unit they spend.
FinalBoss // Gear
Level up your setup
01Top-rated gaming headsetson Amazon→02High-refresh gaming monitorson Amazon→03Gaming chairson Amazon→04Discounted game keyson Kinguin→
Affiliate links · As an Amazon Associate, FinalBoss earns from qualifying purchases.
Want to Level Up Your Gaming?
Get access to exclusive strategies, hidden tips, and pro-level insights that we don't share publicly.
Ultimate Guide Strategy Guide + Weekly Pro Tips