Starfield: Best PS5 Settings Guide – Graphics, HDR, Controls
Dialing In Starfield on PS5: What This Guide Actually Does for You
The first time I landed in New Atlantis on PS5, the game looked gorgeous… and felt oddly mushy. Bright interiors were blown out, shadows in caves were a smeared mess, and my aim on DualSense just wouldn’t stay consistent. So I parked myself in a single district, ran the same loop over and over, and started flipping every setting I could touch.
This guide is the result of that testing: a practical Starfield PS5 best settings setup focused on three things:
- Keeping frame rate as close to 60 FPS as the PS5 version allows
- Fixing HDR so space looks inky black instead of washed-out grey
- Making aiming and camera movement feel predictable on a DualSense
Starfield hit PS5 with a much more mature build than PC had at launch, but you can still sabotage your experience by leaving everything on default. Here’s how to avoid that and get a smooth day-one setup in about 15-20 minutes.
Step 1 – Choose the Right Graphics Mode on PS5
Before you touch individual toggles, you need to pick your overall rendering preset. On PS5, that usually means a simple choice:
- Performance Mode – Targets higher frame rate (around 60 FPS) with lower resolution / detail.
- Quality Mode – Targets higher resolution / more effects, frame rate closer to 30 FPS.
In the Starfield PS5 build I played, the difference was immediately obvious when panning the camera in crowded hubs. Quality mode looked a touch cleaner but stuttered just enough to make aiming feel heavy, while Performance mode smoothed movement out to the point that gunfights felt much more natural.
My recommendation for almost everyone: go with Performance Mode.
You’ll still get detailed environments and impressive lighting, and the higher frame rate does far more for responsiveness than the extra sharpness from Quality mode. The one exception is if you’re on a huge 4K TV, sit very close, and don’t care about combat feel as much; in that case Quality mode is defensible. But for a “smoothest day-one experience”, Performance wins.
You’ll find this under something like Settings → Display/Graphics → Graphics Mode. Set that first, then fine-tune everything else.
Step 2 – Fine-Tune Graphics Settings (Visuals vs FPS)
Once the mode is locked, dig into the granular options. Starfield on PS5 exposes a trimmed-down version of the PC settings, and a few of them matter way more than the rest.
Core visual settings to set and forget
- Volumetric Lighting – Medium
This one surprised me the most. Cranked up, God rays and fog look slightly nicer, but performance takes a noticeable hit, especially in dense cities and foggy planets. On Medium you still get that moody atmosphere in spaceports and alien biomes without the ~10–12% GPU tax that higher settings can bring in heavy scenes. I barely noticed the visual downgrade; I did notice the smoother panning. - Shadow Quality – Medium
Shadows are notorious performance hogs, and Starfield is no exception. In caves and smoky interiors, high shadows look great but chew through frame time. On PS5, Medium is the sweet spot: character and ship shadows still look grounded, while frame pacing stays more stable. Indoors on low you won’t lose much, but outdoors it starts to look flat, so Medium is the safer compromise. - Reflections – High
Reflections have a surprisingly modest impact here compared to volumetrics and shadows. Dropping them all the way down makes metallic surfaces and glass look dull and lifeless, especially around shipyards and high-tech interiors. Keeping this on High costs only a small amount of performance versus Medium but preserves a lot of the game’s “next-gen” sheen. I’d only lower it if you’re extremely sensitive to dips in the busiest hubs. - Indirect Lighting – Medium
The difference between Medium and High here is minimal in motion, especially on a TV. On PC, pushing this too far can even cause odd lighting behavior; on PS5 I never saw anything that bad, but I also didn’t see a good reason to go above Medium. Treat it as a “set once and forget” at Medium. - GTAO / Ambient Occlusion – Medium
Ambient occlusion controls the soft shadows in corners and where objects meet. Without it, scenes look flat; maxing it out is expensive. Medium keeps scenes grounded around crates, corridors, and cockpits without a major frame hit. It’s one of those settings where “middle of the road” really is best.
Comfort and clarity tweaks
- Motion Blur – Low or Off
I dropped this almost immediately. Starfield’s travel and combat are already visually busy; heavy blur just makes it harder to read targets. Turning it to Low keeps a bit of cinematic feel without smearing your view. - Film Grain – Off
Personal taste, but grain made HUD elements and text feel less sharp on my 55″ TV. Turning it off gave everything a clean, “sci-fi monitor” clarity that suits the setting. - Depth of Field – Medium
Max depth of field looks cool in screenshots, but the constant refocusing can be tiring in long sessions. Medium keeps the background nicely separate without overdoing the blur.
Once you’ve set this batch, do a quick stress test: fast-travel to a busy hub like New Atlantis or another large city, spin the camera in third-person, then swap to first-person and run down a crowded street. If the image feels stable and your turning doesn’t hitch, you’ve hit the right balance.
Step 3 – HDR Calibration: Fixing Washed-Out Space
HDR is where a lot of PS5 players go wrong. Starfield can look phenomenal in HDR, but the defaults on my setup skewed slightly yellow-green and made black space look like dark grey soup.
Do this in order
- 1. Calibrate HDR on the PS5 system first
Go toPS5 Settings → Screen and Video → Video Output → Adjust HDR. Follow the three-screen wizard carefully. On each screen, lower the brightness until the logo is just barely visible, then nudge it up a click or two. - 2. Then adjust Starfield’s in-game HDR
Inside the game, head to something likeSettings → Display → HDR Calibration. You’ll usually see controls for overall brightness and black level. The goal is:- Space backgrounds: truly black, not milky.
- White UI elements: bright but not glowing so hard they bleed.
In practice, I lowered in-game brightness a few notches from default and kept black level slightly higher than I would in a horror game to avoid crushing detail in dim cockpits.
- 3. Test in multiple environments
Don’t just rely on one scene. I used:- The cockpit in orbit (good for blacks and HUD brightness).
- A sunny planet surface (sky brightness and terrain contrast).
- A dim interior or cave (shadow detail).
If something looks off in one of these, fine-tune a single notch at a time. Starfield doesn’t expose deep gamma controls, so you’re juggling within a narrow but workable range.
If you notice a persistent yellow/green tint, that’s partly the game’s color grading. You can soften it a bit via your TV’s color temperature (warmer or neutral rather than “Cool”), but don’t overcompensate or skin tones will look weird.
FinalBoss // Gear
Level up your setup
01Best-selling Xbox Series X|S gameson Amazon→02Xbox controllerson Amazon→03Top-rated gaming headsetson Amazon→04Discounted game keyson Kinguin→Affiliate links · As an Amazon Associate, FinalBoss earns from qualifying purchases.
Want to Level Up Your Gaming?
Get access to exclusive strategies, hidden tips, and pro-level insights that we don't share publicly.
Ultimate Guide Strategy Guide + Weekly Pro Tips
Step 4 – FOV Settings: Visibility vs Comfort
Field of View (FOV) controls how much of the world you see at once. Starfield can be claustrophobic on a default narrow FOV, especially indoors and in tight cockpits, but pushing it too far introduces distortion and can shave off a bit of performance.
Here’s what felt best from a couch distance on a 55″ screen:
- General FOV: 75–80 – This opens things up enough that you’re not tunnel-visioned in corridors, but the image still looks natural. At 85+ I started to notice the “fish-eye” effect on the edges.
- Ship / Vehicle FOV: Match or slightly lower (70–75) – A slightly tighter FOV in cockpits keeps instrument panels legible and stops the ship from feeling tiny.
After changing FOV, run around in both first- and third-person for a few minutes. If you feel subtly queasy or the sense of speed in sprint feels wrong, dial it back by 5 points and retest.
Step 5 – DualSense Controller Sensitivity and Aim Feel
Starfield’s gunplay goes from “floaty” to “solid” almost entirely through controller tuning. The patch I played on PS5 added a vertical sensitivity option, which is crucial.
Baseline aim setup
- Go to
Settings → Controls → Look Sensitivity. - Set Horizontal Look Sensitivity to around 55–65.
- Enable Vertical Look Sensitivity and match it to your horizontal value.
With vertical sensitivity linked, aim movement scales more predictably on the DualSense; without it, I constantly overshot vertical corrections on headshots while under-correcting left/right.
Then, if the game offers separate aim-down-sights (ADS) sensitivity, I’d do this:
- ADS Sensitivity: 5–10% lower than hip-fire – e.g., 60 hip-fire, 54–57 ADS.
This keeps quick turns feeling snappy while stabilizing fine adjustments when scoped in.
Extra comfort tweaks
- Look Acceleration: Low or Off (if available) – I prefer raw, linear input for aiming in shooters. Acceleration can make slow adjustments feel sticky and fast flicks unpredictable.
- Deadzone: Slightly below default – If there’s a slider, nudge it down one step so small stick movements register. Don’t go too low or stick drift becomes an issue.
- Adaptive Triggers: Personal preference – The DualSense resistance feels cool for the first hour, but in long sessions it can tire your fingers and slow rapid firing. I ended up lowering or disabling trigger resistance for weapons-heavy sessions.
Test these in a firing range area or on low-level enemies where missed shots don’t matter. Once aim feels like your hands rather than like you’re driving through syrup, you’re there.
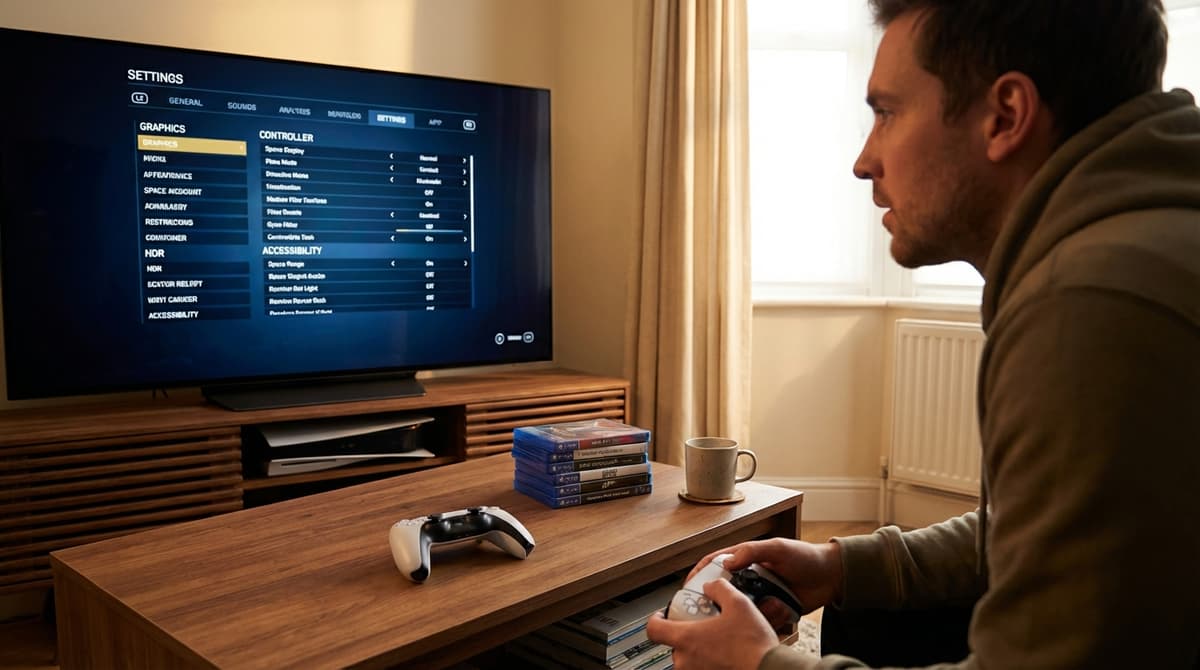
Step 6 – Accessibility and Comfort Options Worth Using
Starfield doesn’t yet have a massive suite of PS5-specific accessibility options documented, but there are still a few layers you can use to make the game more comfortable or more readable, especially if you’re prone to eye strain or motion sickness.
In-game options to check
- Subtitles and UI text size – Make sure subtitles are on, and bump text size up if you’re playing from a couch. Starfield throws a lot of dialogue and item info at you; squinting at tiny text gets old fast.
- Camera Shake / Head Bob – If there’s a slider or toggle, reduce or disable. This single change dramatically improves comfort in zero-G sections and during explosions.
- Motion Blur (again) – Beyond aesthetics, turning blur down helps people who get motion sick from fast panning.
- Difficulty – Don’t sleep on this as an accessibility tool. If aiming or reaction time is a challenge, lowering difficulty so you can enjoy the story and exploration is absolutely valid.
PS5 system-level accessibility to layer on
- High Contrast / Color Filters
UnderPS5 Settings → Accessibility → Displayyou can enable color filters or high contrast mode. This helps if Starfield’s more muted palettes make enemies or loot outlines hard to distinguish. - Button Remapping
InAccessibility → Controllers → Custom Button Assignments, you can rebind any DualSense input. If you struggle with clicking sticks for sprint or crouch, move those to face buttons or shoulders. - Text-to-Speech / Screen Reader
The PS5’s built-in screen reader can help navigate menus if small text is a problem, though support depends on how Starfield integrates system features. It’s worth enabling if you rely on audio cues.
Console data on Starfield’s PS5-specific accessibility features is still sparse, and patches will almost certainly add more options. For now, combining the in-game comfort sliders with PS5’s global accessibility tools gives you solid control over how demanding the experience feels.