
Starfield: Outpost Guide 2026 – Cross-Storage, Free Lanes & More
Why 2026 Completely Changed How Outposts Work
The first time I loaded into my “old” save after the 2026 update, my outposts felt wrong in the best possible way. The clunky resource shuffle between bases was gone, the map actually remembered my favorite planets, and suddenly I had a tiny Millie whale waddling around my main hub like it owned the place. The systems I’d previously brute-forced with spreadsheets and ship-cargo juggling were now baked into the game: cross-outpost storage, Free Lanes, the new Database codex tools, and plug-and-play cabins.
This guide breaks down how all those pieces fit together in real play, what I had to unlearn from the pre-2026 meta, and how to build an outpost network that feels like a proper interstellar factory instead of a bunch of disconnected shacks.
Step 1 – Rebuilding Around Cross-Outpost Storage
Before 2026, I wasted absurd time flying back and forth just to move iron or helium between bases. The April update’s cross-outpost storage is the fix I always wanted, but it only shines if you structure things correctly.
Here’s how I restructured my network so resources flow automatically:
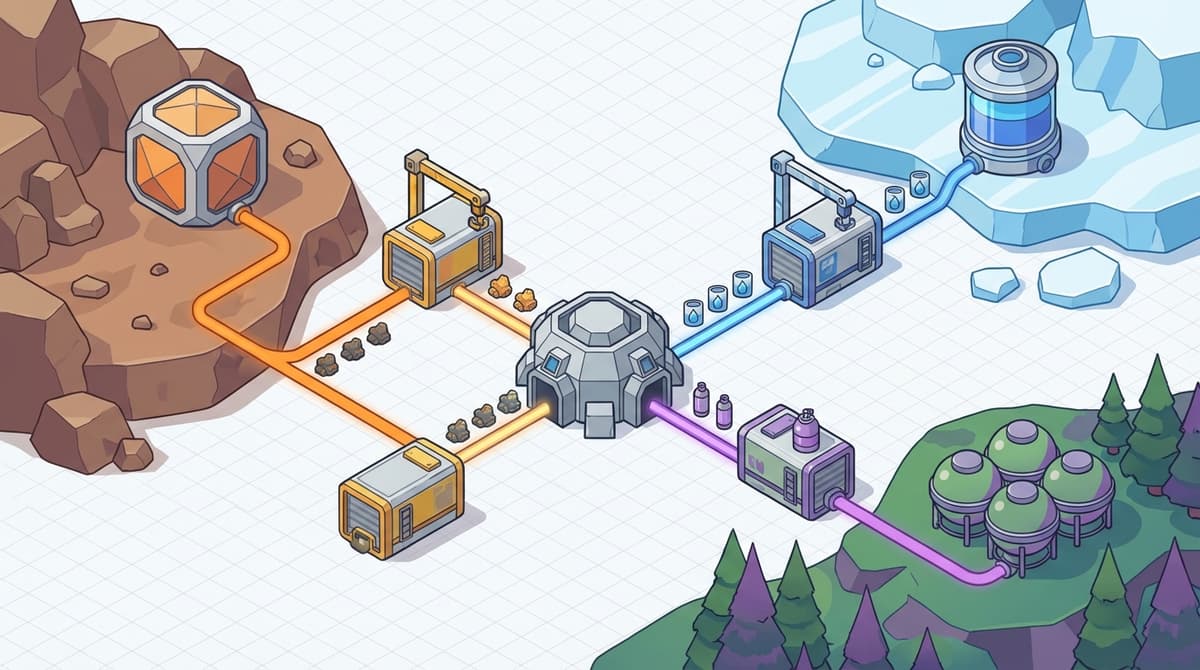
- Pick one “brain” outpost – This is your central hub where you craft, research, and decorate. I picked a fairly chill moon with clear weather so visibility isn’t awful.
- Turn every other outpost into a specialist – One for iron and aluminum, one for gases, one for organics, etc. Don’t try to do everything everywhere anymore; cross-storage removes the need.
- Connect everything via cargo links – Use
Build Mode → Misc → Cargo Linksto tie each specialist into your hub.
The key new behavior is that resource storage at one outpost can be logically shared with others instead of being strictly local. What finally clicked for me:
- Each specialist outpost still needs its own extractors and local Solid / Liquid / Gas storage (e.g., Solid containers built with Aluminum + Iron, Liquid with Aluminum + Nickel, Gas with Tungsten + Copper).
- Your hub outpost uses the cross-outpost storage layer to “see” those materials when you craft at benches, even if the actual crates sit light-years away.
- Workshop-style storage is still your friend – think of it as the virtual buffer for crafting and building pulls, now expanded across your network instead of only per outpost.
Don’t make my early-post-patch mistake: I tried to daisy-chain physical containers, expecting items to auto-flow between them. Building still only pulls from the workshop-style pool, not every arbitrary crate sitting around. Use cargo links + cross-storage, not fancy container snakes.
Once I leaned into this, I stopped hoarding all my ores on my ship. The ship is now just a mobile sampler; the outposts are the real warehouse, shared across the network.
Step 2 – Making Sense of the Database Codex
The Database codex is the part the game doesn’t explain well, and it’s where I initially just mashed buttons until numbers looked right. In practice, it’s an expanded information layer for your outpost and planetary data: what you’ve scanned, what you’re producing, and where bottlenecks are.
How I actually use it now:
- Open your
Scanneror theStar Mapand look for the new Database / codex tab or hotkey prompt. - From there, flip to the Outposts section – you get a summarized view of:
- Which resources each outpost is producing
- Rough production rates
- Which resources are being consumed by fabrication or research
- Use the Resource-centric view to see “Where am I getting aluminum?” instead of “What is Outpost A doing?” This is where the codex is genuinely game-changing.
It’s not a full industrial sim spreadsheet, but it’s enough to make smarter decisions:
- If you see iron output way above usage, you know you can safely ramp up industrial build costs, or turn one of your iron extractors off to save power.
- If tungsten is red or low, you know your gas infrastructure might stall later (gas storage uses tungsten in its construction), so you can plan an expansion outpost accordingly.
The confusing part is that the Database codex is scattered across scanner, star map, and outpost menu, not a single giant screen. The breakthrough for me was mentally treating it as a filter system, not a logbook: I’m either filtering by resource (what do I have and where) or by outpost (what is this location doing for my network).
Step 3 – Planet Favorites & Planning an Efficient Grid
Pre-2026, I’d constantly lose track of “that perfect iron + aluminum moon” because the star map didn’t care about my brain. With the new planet favorites system, the map finally respects your long-term planning.
Here’s how I worked it into my build process:
- When scanning systems, any time I find a planet or moon with:
- Multiple high-value resources (iron + aluminum, helium-3 + aluminum, rare gases, etc.)
- Decent gravity and weather
- Good landing terrain
- Then I build my network in tiers:
- Tier 1 – Easy favorites close to major hubs (great starters and main base sites).
- Tier 2 – Resource-heavy but harsher favorites (high wind, extreme temperatures) for later automation focus.
- Tier 3 – Exotic or rare-resource worlds that I only visit for specific upgrades.
This is incredibly important once you’re flying with Free Lanes (more on that in a moment). Instead of wading through a messy map, your farm worlds and core hubs float to the top of your navigation brain, and you stop losing key sites in the noise of the settled systems.
Tip: I give myself a personal rule: no more than 10 favorited bodies at once. If I want to favorite a new planet, I force myself to unfavorite something I’m genuinely done with. It keeps my logistics clean.
FinalBoss // Gear
Level up your setup
01Best-selling Xbox Series X|S gameson Amazon→02Xbox controllerson Amazon→03Top-rated gaming headsetson Amazon→04Discounted game keyson Kinguin→Affiliate links · As an Amazon Associate, FinalBoss earns from qualifying purchases.
Want to Level Up Your Gaming?
Get access to exclusive strategies, hidden tips, and pro-level insights that we don't share publicly.
Ultimate Guide Strategy Guide + Weekly Pro Tips
Step 4 – Plug-and-Play Cabins: Fast Bases, Not Pretty Ones
The new plug-and-play cabin modules are basically Bethesda’s admission that not everyone wants to freehand a base out of 40 snap points and a dream. I used to overbuild ugly starter shacks and then demolish them later; now I just drop cabins where I need quick functionality.
How I use cabins now:
- Field labs – On harsh worlds, I drop a cabin with a bed, basic crafting, and a small storage just to have a safe checkpoint while I survey or start initial extraction.
- Temporary forward bases – When I’m not sure a spot will become a permanent outpost, I use a cabin instead of building a whole structure. If the location works, I expand around it later.
- Satellite hubs – Near major mining arrays but away from the main landing pad, I’ll throw down a cabin purely as a maintenance station.
There’s still the traditional construction system if you want bespoke architecture, and storage modules (solid, liquid, gas) are still built the old-fashioned way with fixed material costs and specific snaps. Cabins don’t magically replace those; they just give you a fast-build lifestyle module that saves you time when all you really need is somewhere to sleep, craft, and stash loot.
The thing I wish I’d realized earlier is that cabins are best treated as tools, not trophies. Don’t obsess over making your plug-and-play cabin look perfect. Use it to get functional fast, then decide later whether that location deserves a “real” base.
Step 5 – Free Lanes and the New Outpost Logistics Meta
Free Lanes change everything about how your outpost network feels in practice. Instead of just clicking fast travel, you’re actually piloting between bodies, running into dynamic events, and physically threading the space between your worlds. That sounds cosmetic, but it has big implications:
- Outpost clusters matter more – I now deliberately set up “constellations” of outposts within a single system or along an efficient Free Lane route. That way, when I’m doing manual inspections or side trips, I’m not burning a ridiculous amount of real time just to check one farm.
- Route efficiency becomes gameplay – I’ll plot a loop: main hub → gas world → metal farm → exotic resource outpost → back home, grabbing dynamic events (incursions, points of interest) as I pass. Outposts become nodes on that loop.
- Ship build and fuel management actually matter – A heavier ship might slow you down between outposts, so I lean toward mid-size haulers that can still maneuver decently along Free Lanes without feeling like flying bricks.
Before the update, my outpost logistics were mostly UI clicks. Post-Free Lanes, they’re a legitimate layer of space trucking. The trick is to combine this with cross-outpost storage: let automation and cargo links do the grind, then use Free Lanes to spot-check, decorate, and roleplay as the boss doing unannounced inspections.
Practical tip: Favor planets that sit along natural Free Lane routes you enjoy flying. Even if another planet has slightly better resources, the one along your usual route will see ten times more use in practice.
Step 6 – Millie Whale Pet, Decoration, and Making a Real Home
The 2026 outpost expansion isn’t just about numbers; it’s about finally making these places feel lived in. The standout for me is the Millie whale pet.
Once unlocked, you can place your Millie whale at an outpost the same way you’d place other decorative or interactive objects. It doesn’t mine ore or craft weapons, but it does something equally important: it makes your hub feel like somewhere worth returning to. Watching that tiny space-whale waddle around my main cabin while I queue research is the sort of detail that makes the grind feel less like a spreadsheet.
Here’s how I fold Millie and other decor into my functional builds:
- Dedicated “home” zone in the hub – One area is purely aesthetic: cabin, Millie whale, furniture, trophies. No industrial clutter. This also becomes my mental checkpoint when I load in.
- Clear separation between home and factory – Heavy machinery, storage containers, and landing pads live outside or in separate wings. That keeps pathing to benches clean and prevents the place from feeling like a junkyard.
- Use Millie as a landmark – I tend to place Millie near the most-used door or staircase in the cabin, so “follow the whale” becomes a reliable visual anchor when I come back after a long session elsewhere.
It sounds small, but this is the difference between outposts you tolerate and outposts you’re proud of. The 2026 tools finally support both sides: ruthless industrial efficiency and a little cozy sci-fi chaos.