
Street Fighter 6: Alex Command List & Prowler Stance Guide (Year 3)
Why Alex’s Command List Feels Overwhelming (and Why It’s Worth It)
After spending the first evening of Alex’s release grinding in training mode, I hit the same wall a lot of players will: his moveset looks simple until you open the command list and see Prowler Stance plus a pile of follow-ups, grabs, and aerial options. I bounced between Classic and Modern controls, got my inputs crossed more than once, and ate a lot of counter-hits trying to “freestyle” instead of actually learning the moves properly.
The breakthrough came when I stopped treating Alex like a basic grappler and started treating him like a stance character first, grappler second. Once I had his stance options and key specials mapped out in my head, everything else clicked – pressure, whiff punishes, and simple day-one combos. This guide condenses the essential commands and explains how they fit together so you can skip the painful trial-and-error I went through.
If you give yourself about an hour in training mode with this as a reference, you’ll walk away with:
- A clear mental map of Alex’s Prowler Stance options
- All core special and super inputs for Classic and Modern
- A few safe pressure sequences built around Flash Chop
- A starter plan for which buttons to press in neutral and after knockdowns
Step 1 – Understand the Input Notation (So the Move List Makes Sense)
Before diving into specific moves, it helps to decode how Street Fighter 6 and most guides write commands. This will save you a ton of confusion when you’re reading Alex’s in-game list or this guide.
- Directions use numpad or words:
Forward– direction toward the opponentBack– direction away from the opponentDown– crouchUp– jumpDown-Forward / Down-Back– diagonals
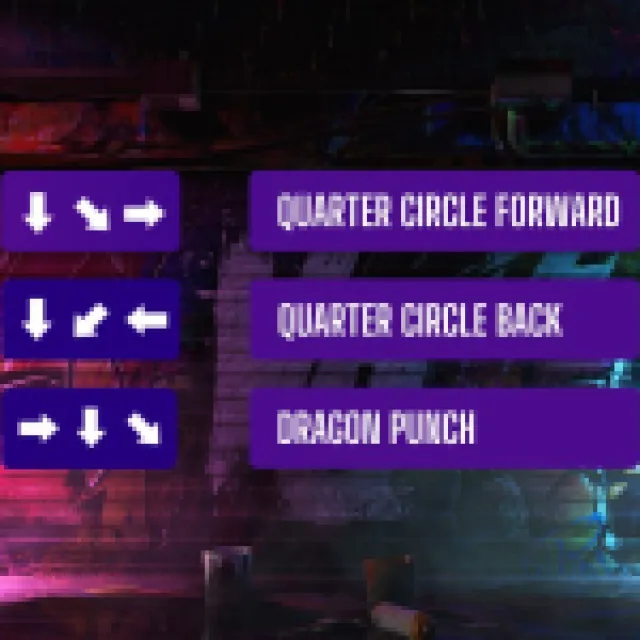
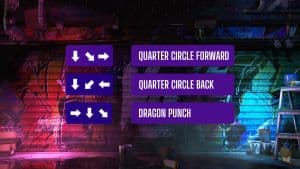
- Quarter Circle Forward (QCF) – roll the stick from
Down→Down-Forward→Forward - Quarter Circle Back (QCB) – roll from
Down→Down-Back→Back - Double QCF / QCB – do that motion twice quickly
- Buttons:
LP– Light PunchMP– Medium PunchHP– Heavy PunchLK– Light KickMK– Medium KickHK– Heavy KickSP(Modern) – Special Move button
On a typical PlayStation layout, for example, LP is Square, HP is R1, and you’ll see why that matters for Alex’s Prowler Stance in a second.
Step 2 – Classic vs Modern Alex: Which Should You Learn?
I tested Alex on both Classic and Modern controls with a PS5 pad on PC. Here’s the honest breakdown based on that experience.
- Classic Controls
- You input every motion manually:
QCF + Punch,Double QCF + Kick, etc. - Gives you full access to every special, including Flash Chop on demand.
- Best if you’re comfortable with traditional fighting game motions or want to play Alex in ranked long-term.
- You input every motion manually:
- Modern Controls
- One-button specials via the
SPbutton plus directions. - For Alex:
- Neutral + SP – Flash Axe (a chop-style special)
- Forward / Down + SP – Aerial Knee Smash
- Back + SP – Power Bomb
- No direct Flash Chop shortcut – you cannot just press SP for it; you still need the motion.
- Great for getting comfortable with his gameplan on day one, but Classic will eventually give you finer control.
- One-button specials via the
My recommendation after grinding both: if you’re new to fighters, start on Modern so you can focus on Prowler Stance, spacing, and throws. If you already know how to do quarter-circles, go straight to Classic so you don’t have to unlearn anything later.
Step 3 – Master Alex’s Core Mechanic: Prowler Stance
Prowler Stance is Alex’s identity in Street Fighter 6. Until I treated this as the starting point of his gameplan instead of a bonus, I kept getting blown up by mashers and 3-frame jabs.
How to Enter Prowler Stance
Alex enters Prowler Stance with a simple simultaneous button press:
- Prowler Stance –
LP + HPtogether (Light Punch + Heavy Punch)
On default PlayStation controls, that’s Square + R1 at the same time. I strongly recommend binding a macro if your control scheme allows it, but even without one the input is quite forgiving.
Once you enter stance, Alex crouches low and gains access to 11 total follow-up options, including command grabs, strikes, and aerial attacks. You can’t block in stance, so every option you choose is a commitment – but that’s also what makes his mix-ups scary.
Grounded Prowler Options You Need First
Instead of trying to memorize all 11 follow-ups at once, I focused on a core set that cover most situations:
- Palmer Strike – From stance,
Down + Light- Quick low strike-style follow-up.
- Great for catching people who expect a grab or overhead.
- Lariat – From stance,
Heavy- Heavy swing that checks opponents trying to walk or jump out.
- Slower than Palmer Strike, but scarier damage-wise.
- DDT – From stance,
Down + Light / Medium- A leaping grab; think of it as your reward for making them freeze or whiff.
- On punish counter situations, his kit lets you route into DDT consistently, which hurts a lot.
- Rear choke grab – From behind in stance,
Light + Medium- Back-turned choke that adds another layer if you side-switch during pressure.
Don’t make my early mistake of just “trying a random button” from stance. Instead, drill a three-move flowchart for day one:
- If they mash buttons → Lariat (Heavy)
- If they sit still / respect → DDT (Down + Light/Medium)
- If they walk back / down-back → Palmer Strike (Down + Light)
Once that basic rock–paper–scissors feels natural, you can start layering in his more exotic follow-ups.
- If they mash buttons → Lariat (Heavy)
- If they sit still / respect → DDT (Down + Light/Medium)
- If they walk back / down-back → Palmer Strike (Down + Light)
Once that basic rock–paper–scissors feels natural, you can start layering in his more exotic follow-ups.
🎮 Get This Game at the Best Price
Compare prices instantly and save up to 80% on Steam keys with Kinguin — trusted by 15+ million gamers worldwide.
*Affiliate link — supports our independent coverage at no extra cost to you
Aerial Prowler Stance Options (6 Total)
Alex’s stance also opens up six aerial options that give him real air presence and juggle routes. These are split into “held down” options and plain down options:
- While holding Down in stance:
- Palmer Strike –
Hold Down + Light - Shoulder –
Hold Down + Medium - Lariat –
Hold Down + Heavy
- Palmer Strike –
- Down-direction aerial follow-ups:
- Tactical Hop –
Down + Light - Air Stampede –
Down + Medium(a stomp-like, counter-ish attack) - Sweep Combo –
Down + Heavy
- Tactical Hop –
The names matter less than the roles at first: light for quick checks and positioning, medium for the stomp/counter-style callout, heavy for the big commitment. I spent 10 straight minutes just entering Prowler Stance, jumping, and cycling these six options to build the muscle memory.
FinalBoss // Gear
Level up your setup
01Top-rated gaming headsetson Amazon→02High-refresh gaming monitorson Amazon→03Gaming chairson Amazon→04Discounted game keyson Kinguin→Affiliate links · As an Amazon Associate, FinalBoss earns from qualifying purchases.
Step 4 – Core Special Moves: Flash Chop, Power Bomb, and Friends
Outside stance, Alex has a set of powerful specials that define how he gets in and stays in. These are the ones you absolutely want on lock.
Flash Chop & Flash Axe – Your Pressure Starters
Flash Chop is one of Alex’s most important tools:
- Flash Chop (Heavy) –
QCF + HP(Classic)- On block, this move is plus, meaning Alex recovers before the opponent.
- That lets you safely continue pressure or set up a Light Power Bomb mix-up.
- Flash Axe – (Modern)
Neutral + SP- Acts as an easy-access chop-style special for Modern users.
- Use it as a simple “get in” and pressure starter while you’re still learning motions.
The key lesson I learned here: after a blocked heavy Flash Chop, don’t panic. You are allowed to keep pressing. I got blown up early by backing off or trying unsafe grabs. Instead, think of it as your turn to run a strike/throw game with jabs, mediums, or delayed Light Power Bomb.
Power Bomb & Aerial Knee Smash – Command Grabs
Alex wouldn’t be Alex without his command grabs:
- Power Bomb
- Classic: Motion-based command grab (check the in-game list for the exact motion).
- Modern:
Back + SP. - Use Light Power Bomb after plus-on-block Flash Chop for a potent day-one mix.
- Aerial Knee Smash
- Anti-air style grab special.
- Modern:
Forward / Down + SP(depends on distance and state). - Great for calling out predictable jumps once people start respecting Power Bomb.
My biggest early mistake was spamming raw Power Bomb in neutral. Instead, treat it as the payoff after you’ve established threats with Flash Chop and Prowler Stance – not your primary neutral tool.
Want to Level Up Your Gaming?
Get access to exclusive strategies, hidden tips, and pro-level insights that we don't share publicly.
Ultimate Guide Strategy Guide + Weekly Pro Tips
Step 5 – Super Arts and Hyper Bomb
Alex’s supers round out his kit with big damage and more grab threats. Learning the motions cleanly will save you from those heartbreaking “I meant super, got regular special” moments.
- Level 1 – Raging Spear
- Input:
Double QCF + Kick(Classic). - Shoulder tackle-style super; excellent for confirming from grounded hits.
- Input:
- Level 2 – Sledgecross Hammer / Omega Wing Buster
- Base Level 2:
Double QCB + Punch. - Gives you big strike payoff and extensions.
- Omega Wing Buster comes out as an enhanced grab ender during certain sequences, particularly from Overdrive Power Drop.
- Base Level 2:
- Level 3 – The Final Prison
- Input:
Double QCF + Punch. - Huge damage super with variant animations depending on context.
- Practice confirming into this from your strongest starters (jump-in > heavy, punish counter situations).
- Input:
On top of these, Alex has Hyper Bomb, which only becomes available during Overdrive Power Drop (OD version of one of his specials). During that state, you’ll see the Hyper Bomb follow-up appear in the HUD; input the prompted forward motion and buttons to trigger it as an extended command grab sequence.
My advice is to ignore Hyper Bomb until you can consistently get Level 1 and Level 3 out on command. Once your execution is stable, then start labbing OD Power Drop & Hyper Bomb routes.
Step 6 – Simple Drills to Lock Everything In
Here’s the exact practice routine I used to get comfortable with Alex’s commands in about an hour.
- Drill 1 – Raw Motions (10 minutes)
- On Classic, do 20 reps each of:
QCF + HP(Flash Chop)Double QCF + Kick(Raging Spear)Double QCF + Punch(The Final Prison)
- Focus on clean inputs; don’t worry about hitting the dummy.
- On Classic, do 20 reps each of:
- Drill 2 – Prowler Flowchart (20 minutes)
- Set the dummy to guard and occasionally mash jab.
- Enter Prowler Stance, then rotate:
- Lariat (Heavy) vs mash
- DDT (Down + Light/Medium) vs blocking
- Palmer Strike (Down + Light) vs walk-back
- Watch when you get counter-hit and adjust your timing.
- Drill 3 – Flash Chop Pressure into Power Bomb (20 minutes)
- Record the dummy to block your string.
- Practice:
Crouch MP → QCF + HP (Flash Chop)- Then either:
- Walk forward a step → Light Power Bomb
- Or
LPcheck to frame-trap
- Alternate between strike and grab so you don’t become predictable.
Once these feel natural, start sprinkling in Aerial Knee Smash for jump callouts and your Level 1/3 supers for big punishes. The stance and Flash Chop pressure are the real foundations; everything else is optimization on top.
What to Expect Next as You Level Up Your Alex
Alex is a stance-heavy bruiser with a real learning curve, but that also means he scales incredibly well as you improve. After you’re comfortable with the commands in this guide, the next steps are:
- Lab juggle routes from his Prowler Stance aerials.
- Experiment with Drive Rush into Flash Chop for better pressure.
- Pay attention to patch notes that might tweak his stance frame data or Flash Chop advantage.
- Study high-level match footage to see how pros balance strike/throw vs. stance threats.
If you stick with the drills and treat Prowler Stance as your core, not your gimmick, Alex goes from feeling clumsy and unsafe to feeling like a walking checkmate machine. The commands are the hard part; once they’re in your hands, the fun really starts.