
Tomodachi Life 2: How to unlock every building
After a full week of running a fresh island and checking unlock pace in short handheld sessions, the biggest takeaway is that buildings in Tomodachi Life: Living the Dream are not random rewards and they are not missable. They are progression markers for how healthy your island life is. If you keep adding residents, clear problem bubbles, level Miis, and let friendships actually develop, the island keeps expanding. If you tunnel on one system, unlocks slow down fast.
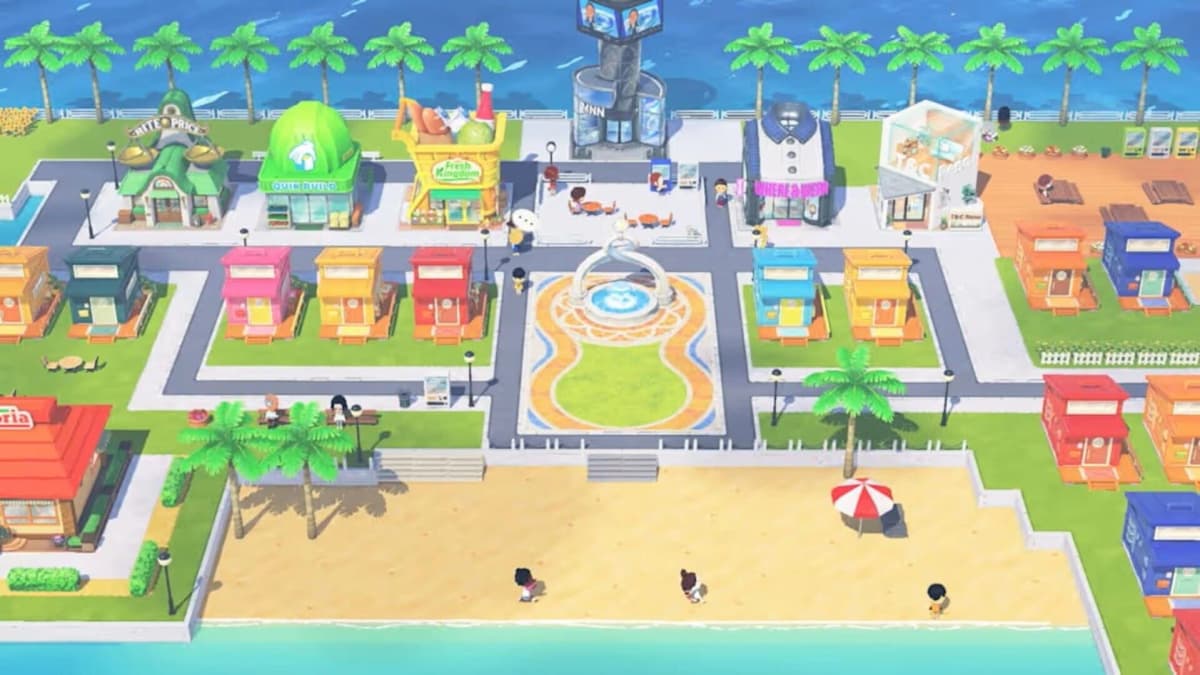
The other thing worth clearing up immediately is the building count. Depending on which regional guide you read, you may see 13, 14, or even 15 unlockable buildings. That disagreement usually comes from whether special-case structures like the Mansion are counted separately and how one-off facilities are treated compared to repeatable shop types. For practical play, think of the island as having 13 core facility unlocks, with a couple of edge-case counts depending on how a source labels housing-related structures.
How building unlocks actually work
This is the part that matters more than memorizing a fake “perfect order.” Tomodachi Life: Living the Dream does not use one rigid chain where building B always follows building A. Instead, most unlocks come from a small set of milestone types that overlap constantly while you play.
- Add new residents through
Mii Menu → Add Resident. - Enter apartments with thought or pondering bubbles and solve the request inside.
- Level at least one Mii early by feeding them, helping with requests, and giving rewards.
- Let relationships move forward through friendship requests and confessions.
- Engage with activities that produce treasures, photos, or other side rewards instead of ignoring them.
If your island is doing all five of those things, you are on track. That is why no building can really be “missed.” The game wants a balanced island, not a single hard challenge cleared in the correct order.
The three early buildings you can unlock almost immediately
Fresh Kingdom / the Supermarket
This one is essentially your tutorial unlock. After you create your first Mii, you will get an early food-related request. Solve that request and the supermarket-style building, often referred to as Fresh Kingdom in English write-ups, becomes available. In real terms, this should happen in your first few minutes.
Build it as soon as it appears. That sounds obvious, but it matters because food is the easiest, fastest way to keep requests moving and help Miis gain experience. Delaying this building slows everything else.
Wishing Fountain
The Wishing Fountain is the first unlock that teaches you how the game thinks about progression. You do not get it from population alone. You get it by leveling up one Mii. On my island, this was comfortably doable in the opening stretch just by solving bubbles and giving that Mii enough attention to hit their first level.
This fountain is more important than it looks. It is tied into later wish and treasure systems, and current guides also note that it is the one building you cannot simply buy multiple copies of later. Most facilities can be duplicated once unlocked; the Wishing Fountain is the exception. So when it appears, place it and treat it as a permanent part of your island plan.
Where & Wear / the Boutique
The Boutique unlock is one of the cleanest requirements in the game: create 3 residents. Open Mii Menu → Add Resident and get your early population up instead of waiting for the island to “naturally” feel busy. This next step is where most islands slow down, because players spend too long fussing over one or two Miis when the game clearly wants you to establish a social pool.
Once the Boutique opens, your customization options expand and requests become more varied. More variety means more opportunities to solve problems, which feeds directly back into future building unlocks.
Midgame unlocks: where variety matters more than speed
After the first three buildings, the pace changes. Raw time spent is less important than whether your island is touching every major system. This is why some players feel “stuck” while others keep unlocking facilities without trying. The game rewards breadth.
Workshop and treasure-linked facilities
Current guides consistently place the Workshop among the core unlockable buildings, and it sits in the part of the game where treasures and side rewards start mattering. If you are ignoring mini-activities or not following through on the systems that generate treasure, these utility buildings tend to arrive later.

The practical rule is simple: when the game gives you a side system, use it. Do not play the island like a pure apartment manager. Treasure-related progression is part of the building loop.
Photo Studio and other customization spaces
The Photo Studio is another confirmed facility, and in practice it appears once your island has enough life in it to justify a broader range of activities. If you are adding residents and using clothing or appearance systems instead of letting them sit untouched, these creative buildings arrive naturally.
There is also a midgame customization milestone around the Palette House in current building breakdowns. That matters because later wishes at the Wishing Fountain interact with this part of the game. In other words, customization is not cosmetic filler; it is part of your progression web.
Restaurant and daily-life venues
The Restaurant shows up in every broad list of unlocks, and it fits the game’s wider logic: bigger island, more varied resident needs, more lifestyle spaces opening up. If your population is climbing and you are clearing requests consistently, this class of building should show up in your midgame without special grinding.
The key point here is that midgame facilities are less about one secret trigger and more about proving your island is active in several ways at once.
FinalBoss // Gear
Level up your setup
01Top-rated gaming headsetson Amazon→02High-refresh gaming monitorson Amazon→03Gaming chairson Amazon→04Discounted game keyson Kinguin→Affiliate links · As an Amazon Associate, FinalBoss earns from qualifying purchases.
Want to Level Up Your Gaming?
Get access to exclusive strategies, hidden tips, and pro-level insights that we don't share publicly.
Ultimate Editor's Pick Strategy Guide + Weekly Pro Tips
Relationship gates: the hidden pace check for later buildings
If you are still missing major facilities after a decent number of sessions, relationship progress is usually the reason. Some of the later unlocks are clearly tied to friendship growth, confessions, or social density rather than simple population count.
Ferris Wheel
The Ferris Wheel is a good example of a social unlock. It is regularly listed among the island’s major facilities, and it aligns with the game’s romance and friendship systems. If heart-related events or confession-style milestones are sitting untouched on your island, you are probably delaying this category of building.
My practical advice is to stop thinking of friendship bubbles as optional flavor. They are progression. When one Mii wants to befriend another or push a relationship forward, resolve it.
Mansion
The Mansion is the late-game structure most likely causing the 13-versus-15 count dispute. Some guides treat it as part of the core building list, others separate it as a housing expansion. Either way, it is tied to your island maturing, not to some obscure one-time trick. If you keep population growing and continue solving day-to-day problems instead of leaving your Miis in a social deadlock, it arrives as part of your long-term buildout.
The fastest practical route to unlock everything
- Create your first resident and clear the opening food request to unlock the supermarket.
- Add residents aggressively until you reach at least 3, which gets the Boutique online.
- Focus on leveling one Mii quickly for the Wishing Fountain.
- Keep rotating through apartments and clear every active bubble instead of only easy food requests.
- Use customization, treasure, and activity systems as soon as they appear so Workshop- and Photo Studio-type buildings do not lag behind.
- Push friendships forward and do not sit on confession events; social progress is a real building gate.
- Continue adding residents over time so late population structures, including the Mansion, can trigger.
- Build each newly unlocked facility right away, because new venues create new request types and help the next unlock happen faster.
In terms of pacing, the first three unlocks can happen very quickly, often in the opening session. Midgame facilities usually follow over the next few play sessions if your island activity stays balanced. The final social and housing-related buildings take longer, but they are still part of natural progression rather than a hidden side quest chain.
Common reasons your building unlocks stall
- Your island population is too low. A quiet island cannot generate the friendship web later facilities expect.
- You are ignoring social bubbles. Friendship and confession events are not optional fluff.
- You are not leveling anyone. The Wishing Fountain alone proves that experience gains matter early.
- You only check apartments and ignore side systems. Treasure, photos, wishes, and customization all feed the broader unlock network.
- You expect one exact unlock order. The game is milestone-based, so comparing your island to someone else’s sequence can be misleading.