
You’re Probably Wasting Provisions in Norse: Oath of Blood – Do These 2 Quests This Way Instead
Game intel
Norse: Oath of Blood
Norse is a turn-based tactics and combat game for PC and console. Set against the rich backdrop of the Viking Age, join Gunnar, a young warrior, on a relentles…
Why These Two Missions Matter (And How I Almost Blew Them)
After about ten hours of poking around Norse: Oath of Blood, I ran straight into a wall with the story missions A Karl Comes Begging and Iron Will. I had my settlement half-built, I was happily mashing Next Turn, and then suddenly I was low on provisions, my people were hungry, and I almost missed the short deadline on A Karl Comes Begging.
The breakthrough came when I realized these quests aren’t just combat checks – they’re a test of your settlement planning and resource discipline. Once I tightened my build order (Fishing Hut & Dock first, Smithy/Seamstress next, Market later) and cleaned up my party tactics (Mighty Hew, Cripple, and Iron Will used intentionally), both missions turned from near-fails into clean, satisfying wins.
One-Minute Gameplan
- Before the quests: Prioritize Fishing Hut → Dock → Smithy → Seamstress → Market. Don’t spam
Next Turnwithout multiple projects queued. - A Karl Comes Begging: Loot every barrel/bag before talking to the chief, then protect him at all costs. Use Arn’s Mighty Hew to shred clusters, Sigrid and your archers to delete the high-ground archer first.
- Iron Will: Bring five solid fighters, respect the bog traps, and stick to wooden platforms. Focus down the Jarl of the Mire using armor-stripping and Cripple.
- Across both missions: Loot everything, heal with dried meat/berries between fights, and use Iron Will to keep your frontline alive through big reinforcement waves.
Settlement Prep: Don’t Starve Yourself Before Battle
The first time I reached these missions, I’d been treating the settlement like background noise. I’d hit Next Turn just to see the next quest, and my provisions quietly tanked. When A Karl Comes Begging popped up with its short deadline, I had almost nothing in storage – not great when you’re about to defend a village.
Essential Build Order
- Fishing Hut: This is your early lifeline. Build it as soon as you reasonably can. Once active, it smooths out your food income so you’re not burning provisions faster than you make them.
- Dock: Pair this with the Fishing Hut. Together they make food far less of a headache and help you sustain the turns you’ll spend on bigger projects.
- Smithy: I delayed this in my first run and regretted it. Once built, you can craft better weapons, which is huge for these missions. Arn with a better axe and Gunnar with a solid weapon makes a big difference when you’re trying to delete enemies before they reach your squishier units.
- Seamstress: Easy to ignore, but don’t. Extra armor and upgraded clothing on Sigrid and your frontliners often means surviving with 2 HP instead of going down.
- Village Market: It takes several turns (four in my run) and requires the Smithy completed. Start it when you already have other projects queued so you’re not wasting turns. The Market pays off long-term, so treat it as a medium-term goal after your basic food & gear infrastructure is online.
The key lesson: never advance turns with nothing building. Queue projects, then hit Next Turn. That way, while you’re off doing these story missions, your settlement is quietly getting stronger instead of just burning through time and provisions.
FinalBoss // Gear
Level up your setup
01Top-rated gaming headsetson Amazon→02High-refresh gaming monitorson Amazon→03Gaming chairson Amazon→04Discounted game keyson Kinguin→Affiliate links · As an Amazon Associate, FinalBoss earns from qualifying purchases.
A Karl Comes Begging – Full Walkthrough
This mission has the tighter deadline, so when it appears, don’t sit on it. Finish your current turn, check you’re not starving, then commit. Both times I tried to delay it, I felt the pressure creep in on the provisions side.
Recommended Party
- Mandatory: Gunnar, Sigrid
- Recommended: Arn (for Mighty Hew), Buldi (mobility and extra melee damage)
- Alternative: Swap Buldi for Gormr if you prefer his toolkit – he’s a reliable frontline as well.
I run Gunnar and Arn as my main bruisers, with Sigrid on ranged duty and Buldi flexing wherever a flank is about to collapse.
Pre-Fight Loot Route (Don’t Skip This)
Before you talk to the homestead owner/village chief and trigger the fight, do a quick lap for supplies. This takes a minute or two and pays off immediately:
- From spawn, loot the open barrel directly ahead for 20 provisions.
- Head down the right path toward the shore for another open barrel with more provisions.
- Double back, take a right toward the central fire where the chief stands, but do not talk to him yet.
- On the left, you’ll see a wooden bridge. To the right of it, loot an open barrel containing 15 oil.
- Cross the bridge, shoot down the bag hanging from a rope, and loot it.
- Only then go speak to the chief to start the defense.
Don’t make my early mistake of beelining the quest marker. Those extra provisions and oil matter over the next few missions.
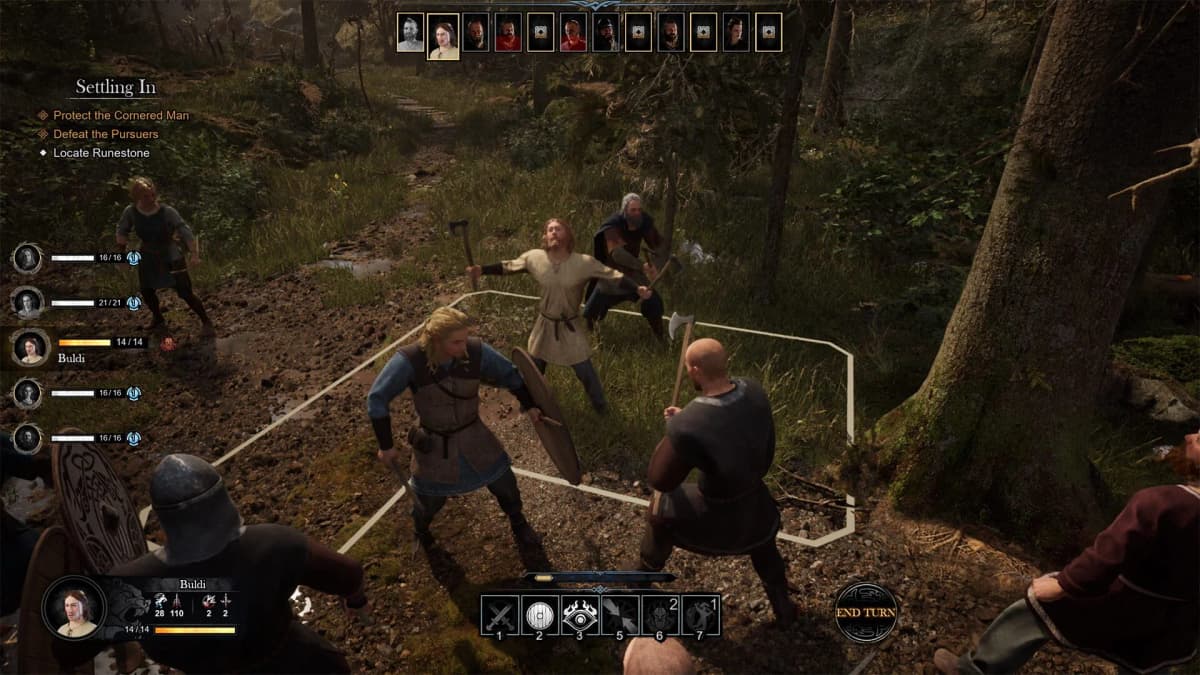
Phase 1 – Protect the Chief from the First Four Outcasts
Once the fight kicks off, four outcasts surround the chief. One has Engaged him. You’ll see blue deployment tiles: place your melee units on the front line near the chief, and put Sigrid on the back row, ideally to the left so she can cover the high-ground later.
Here’s the opening that consistently carried my runs:
- On turn one, press
Tabuntil you control Arn. - Move Arn to the left tile adjacent to the chief.
- Use Mighty Hew targeting the three-tile line so you hit two enemies at once. This chunks both and sets up kills.
- If you brought Buldi, use his leap to cross tiles and finish off whichever outcast is lowest, especially the one Engaging the chief.
- Use Sigrid to clean up anyone left at low HP. Don’t waste her shot on someone at full health if you can remove a body from the field.
Your priority here is simple: free the chief from Engage and keep him above half HP. If he’s hurt, use a Bandage from whichever character stands next to him instead of throwing that character into a risky attack.
Phase 2 – Reinforcements and the Dangerous High Ground Archer
After the first four drop, things get messy. About five more enemies arrive from different directions, including an archer on high ground. The first time I ignored her, she shredded the chief in a couple of turns and ended my mission.
- Immediately focus the high-ground archer with Sigrid and your other ranged unit (or a long-reaching melee if available). Removing her is non-negotiable.
- Use Gunnar to clean up the enemy on the left side near the fire.
- Send Arn and Buldi to the right flank to prevent anyone from reaching the chief’s back.
- Use Cripple from your archers on fast or distant enemies to keep them from closing in quickly.
Once you’ve stabilized, more reinforcements will arrive from the north-east side of the fire – in total, around six extra enemies. This is where positioning and your abilities really matter:
- Consider moving Sigrid and the chief up onto the now-safe high ground previously occupied by the archer. This gives better sight lines and keeps the chief behind your melee wall.
- Use Mighty Hew whenever two enemies line up; it’s your best tool for triggering executions and clearing the field quickly.
- After each execution, chain into the next target and pop Iron Will to keep your frontliner sturdy through counterattacks.
- Keep an eye on the chief’s HP. If he drops too low, pull a melee back to body-block and Bandage rather than chasing kills.
When the last wave falls, don’t rush out. Take a moment to loot every corpse and container you can reach. The extra resources will help you recover provisions and prep for Iron Will.
Want to Level Up Your Gaming?
Get access to exclusive strategies, hidden tips, and pro-level insights that we don't share publicly.
Ultimate Guide Strategy Guide + Weekly Pro Tips
Iron Will – Bog Traps, Armor, and Long-Range Fights
Unlike A Karl Comes Begging, Iron Will gives you more time before the deadline. Use that breathing room: push your Smithy/Seamstress progress, make sure your people aren’t starving, and then accept the mission when your gear is in a good place.
Recommended Party & Opening
- Party of five: Gunnar, Sigrid, Arn, Buldi, Gormr
This lineup gives you three strong melee units plus two ranged threats. As you start, head straight ahead, loot the open barrel, and continue until you meet the bog iron harvesters. Negotiations fail, and the fight starts.
Fight 1 – Jarl of the Mire and the Bog Traps
On deployment, put your close-range fighters up front and Sigrid centrally but protected.
- The enemy moves first. If two approach side by side within one or two tiles of each other, rotate to Arn and hit them both with Mighty Hew.
- The Jarl of the Mire has a lot of HP and 1 armor. Start by hitting him with Mighty Shot (or another armor-stripping attack) to peel that off.
- Tag the Jarl with Cripple so he can’t reposition or rush your backline as easily.
- Have Gormr and Arn focus him while Gunnar and Buldi manage the adds.
This fight punishes sloppy movement more than raw damage. The bog is littered with traps that inflict Cripple, the same status you’re happily throwing on enemies.
- Only move across the wooden platforms unless you’re absolutely forced off them.
- If an enemy limps from a trap, great; if one of your characters does, pull them back, don’t leave them stranded in the open.
- Once the Jarl drops, clean up the remaining enemies on the northwest and east sides, letting them come to you instead of overextending into trap zones.
Mid-Mission Healing & Scavenging
After the first fight, push north out of the swamp. Keep your eyes open:
- On the right, grab the dried meat. Use it on whichever character is lowest – usually a melee who tanked the Jarl.
- A bit further up, collect the red berries and heal the rest of the squad. Don’t go into the next fight at half strength if you can help it.
Soon you’ll see glowing red eyes ahead – that’s your cue that the second, tougher engagement is about to start.
Fight 2 – Fortified Poachers, High Ground, and Cover
This encounter is where I wiped the most. Enemies sit behind cover, some on high ground, and they won’t advance because they know they have the positional advantage. You must break their setup.
- The wattle fence can be broken in a single hit. Don’t walk through the main entrance if it’s a death funnel – smash a side section and create your own angle.
- If an enemy bowman is in an Alert stance, send Sigrid to take a shot and cancel that stance if possible, or flank with a melee through the broken fence.
- Push your melee characters to the right side while leaving Sigrid more central so she can shoot at targets on both left and right high ground.
- Use Sigrid’s shots to pick off the high-ground enemy on the left. High-ground archers are your worst damage source over time.
When enemies start clustering around the breach or near cover, it’s time for Arn again:
- Line up Mighty Hew so you hit multiple targets and potentially knock them back out of cover or into bad positions.
- Once a priority target is low, focus him with the whole team. Apply Cripple, hit him, then step your melee back a tile or two so he can’t immediately counter.
- When you secure executions, chain into the next enemy and pop Iron Will on your bruiser to keep them in the fight through incoming arrows.
After you clear the right side and central enemies, move Sigrid up to the high ground yourself and finish off whoever is left on the flanks. At this point, it’s about not getting greedy: stabilize, pick off the remaining targets, and only then push forward.
Once the last poacher drops, loot every body and container before ending the mission. That habit alone kept my provisions stable for the next stretch of the game.
Big Takeaways for Surviving Early Story Missions
- Plan your build order: Food (Fishing Hut, Dock) first, then combat power (Smithy, Seamstress), then economy (Market).
- Don’t spam turns: Always have projects running before hitting
Next Turn, or you’ll drain provisions for nothing. - Loot everything: Barrels, bags, bodies, and mid-mission food like dried meat and berries make these missions much safer.
- Use abilities with intent: Mighty Hew for multi-hit and executions, Cripple to control dangerous targets, Iron Will to carry your frontliner through long waves.
- Respect positioning: Protect the chief, use high ground yourself, and avoid traps in the bog by sticking to wooden platforms.
If you tighten up your settlement planning and follow these positioning and ability tips, A Karl Comes Begging and Iron Will go from stressful scrambles to controlled, satisfying victories. I nearly failed them the first time through, but with this approach they became two of my favorite early missions – and they set you up nicely for the tougher fights still to come.