MOUSE: P.I. For Hire – Big Mouse, Little Hope Walkthrough
Game intel
Mouse: PI For Hire
Join private investigator Jack Pepper on a guns blazing, jazz-fueled adventure in MOUSE: P.I. For Hire. MOUSE combines the charm of hand-drawn rubber hose anim…
The final mission in Mouse: P.I. For Hire is best treated as a sequence of mechanical checks rather than one long boss encounter. For players using this as both an endgame_walkthrough and a boss_fight_guide, the clean route is consistent: survive the BMP aerial assault with the unlimited-ammo James Gun, grapple forward into the control room, destroy the four speakers protecting Milford Soyer, manage the rocket phase, read the safe lanes in the laser tripwire section, break the shield again during the bodyguard interlude, then finish the stronger repeat of the Soyer fight before releasing John.
If you are wiping repeatedly, it is usually not because your damage is too low. The common failure points are target priority and movement discipline: shooting Soyer before removing all speakers, standing in the center during laser walls, or chasing the bodyguard while shield mechanics are still active. This walkthrough stays focused on those practical failure points.
Mission structure and the rules that matter
Big Mouse, Little Hope is the endgame sequence built around five short objectives that flow directly into each other. The game presents them as story beats, but mechanically they reduce to a few clear rules.
- Shoot incoming explosives during the BMP air assault. You have unlimited ammo here, so conservation is irrelevant.
- Use the forward path aggressively during grapples between planes; hesitation is more dangerous than moving.
- Every Soyer shield phase is solved by speakers first, boss second.
- Rocket salvos are telegraphed. Move as soon as the landing marker appears instead of trying to finish damage.
- Laser tripwires always leave survivable space. Read the opening before committing.
- During the bodyguard section, destroy speakers before trading with the heavy target.
- Heal from the medkits positioned at the edges during laser-heavy phases instead of drifting into the center under pressure.
That is the entire mission in compressed form. The rest is execution under slightly increasing pressure.
Go After Soyer: surviving the BMP onslaught
The opening chase is simpler than it looks. BMP planes send explosives toward you while Soyer escapes ahead. The correct response is to hold your sightline slightly forward and shoot explosives early with the unlimited-ammo James Gun. Because the game removes ammo pressure here, the only meaningful resource is your reaction time. Firing more is better than waiting for a perfect shot.
The mistake to avoid is aiming at distant enemies while an explosive is already inbound. The explosives are the immediate fail condition; BMP troops are just noise unless they are directly blocking your advance. If your aim feels unstable on console, shorten your reticle travel by keeping the crosshair near the center of the screen and making small corrections. On PC, avoid overflicking. These targets are predictable, not twitch-random.
Once the aerial pressure breaks, you move by grappling between planes and pushing toward the control room. Take these transitions quickly. The layout is built to funnel you forward, and pausing too long only gives enemy fire more time to connect. Treat each grapple point as a checkpoint: clear what is directly in front of you, move, re-center the camera, then clear the next lane. There is no advantage to lingering behind cover if the next hook is already visible.
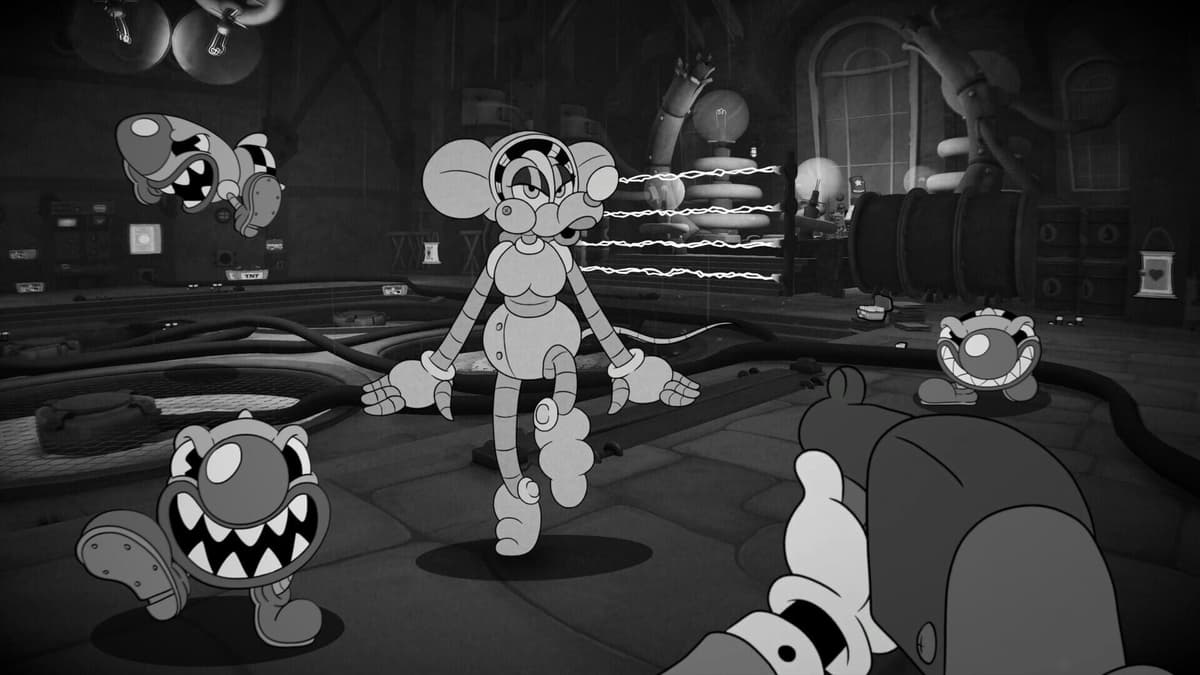
First Milford Soyer phase: remove the speakers, then punish
Inside the control room, Soyer is protected by a barrier tied to four speakers, two on each side. This is the first real filter in the fight. Damage on Soyer does not matter until all four speakers are destroyed. Do not split focus. Sweep one side clean, rotate, then break the other side.
The practical route is to use whatever weapon gives you the most reliable precision on fixed targets. If you have the Ray Gun available and are comfortable with it, it is useful for fast burst on exposed targets, but raw reliability matters more than theoretical damage. Stationary speakers should disappear quickly; missing them repeatedly is what drags the phase out and exposes you to extra pressure.
Once the speakers are gone, Soyer becomes vulnerable and starts pairing his exposure with rocket attacks. The landing zones are telegraphed, so the correct rhythm is simple: short damage burst, reposition, short damage burst, reposition. Trying to empty a long attack string into him is how you get clipped by the next rocket marker. This phase rewards restraint more than aggression.
If Soyer seems to be surviving longer than expected, check whether you are interrupting your own damage windows by overmoving. The arena is not asking for constant sprinting. Move decisively when a rocket is marked, then stabilize and shoot. Excessive panic movement ruins more damage than the boss does.
Laser tripwire phase: read the gaps, do not fight the pattern
After the rocket exchange, the mission shifts into a laser tripwire survival segment. This is the most visually busy part of the endgame, and it is where many runs become messy. The important point is that the lasers are not arbitrary. Each wave leaves safe openings, and the later sets merely reduce your margin for error rather than turning the phase into instant failure.
Start by reading the entire formation for half a second before committing to a lane. Players often die here because they react to the nearest beam instead of the pattern as a whole. That works on the first wave and fails later, when the safe path requires one clean movement instead of multiple corrections.
The medkits at the edges are important. Use them deliberately. If you take a hit and a clear opening exists near an edge, route toward the medkit and recover there rather than trying to heal mentally by playing more aggressively. The arena edges are also useful because they reduce the number of directions you need to monitor at once.
Do not jump randomly through tripwires unless the pattern clearly asks for vertical clearance. Most of the survivable space is horizontal. Unnecessary jumps slow course correction and make the next beam harder to read. This phase is closer to lane selection than to traditional dodging.
FinalBoss // Gear
Level up your setup
01Top-rated gaming headsetson Amazon→02High-refresh gaming monitorson Amazon→03Gaming chairson Amazon→04Discounted game keyson Kinguin→Affiliate links · As an Amazon Associate, FinalBoss earns from qualifying purchases.
Want to Level Up Your Gaming?
Get access to exclusive strategies, hidden tips, and pro-level insights that we don't share publicly.
Ultimate Guide Strategy Guide + Weekly Pro Tips
Bodyguard interlude: target priority decides the phase
Once the laser sequence ends, a bodyguard enters with additional speaker protection in play. The same rule from the first Soyer phase still applies: speakers first. If you begin dumping damage into the bodyguard while shield mechanics remain active, you extend the fight and invite BMP adds, rockets, and positional mistakes all at once.
Open the phase by scanning for speakers immediately. Clear them in a fixed rotation rather than turning this into a chaotic arena sweep. After the shield support is down, switch to your heaviest reliable damage. The strongest weapon in your loadout is correct here, especially if it can punish weak points consistently. Some walkthrough evidence notes that the bodyguard is vulnerable from higher angles, so use any available elevated line of fire when it gives you a clearer shot instead of forcing close-range trades.
The bodyguard section becomes dangerous when players tunnel on the heavy target and stop accounting for the room. BMP enemies and rockets can overlap with the main duel. Keep the bodyguard in view, but clear immediate adds if they are cutting off movement lanes. This is not wasted time; it preserves the space you need to dodge the next major attack. If you try to brute-force the phase, the arena usually punishes it.
The unlimited-ammo portions of the mission also change the logic here. Since resource conservation is relaxed, do not hesitate to suppress adds or break speakers quickly. The efficient play is the one that simplifies the room, not the one that saves shots.
Final Soyer phase and releasing John
After the bodyguard drops, the mission returns to Soyer for the final exchange. Mechanically, this is a stronger repeat of what you have already seen. That is useful, because the game is not introducing a new puzzle at the end. Reapply the same sequence: remove support objects, respect telegraphed explosives, and only extend damage when the arena is actually safe.
Do not become careless because the structure is familiar. Repeated phases often cause more deaths than new phases because players assume they can rush the finish. If Soyer is still cycling rockets or shield support, treat him as a fresh boss state, not as a target at 10% health.
Once Soyer is finally down, the last task is easy to miss in the post-fight release of pressure: free John, who is tied up in the corner. Do not leave the arena mentally before completing that interaction. That action closes the mission and confirms the rescue beat.
Common mistakes that waste attempts
- Ignoring one speaker and firing at Soyer anyway. If the barrier is still active, you are spending time for no return.
- Standing center-stage during laser tripwires. The edges are safer because they reduce your decision tree and place medkits nearby.
- Overcommitting to rocket windows. One short burst is enough; greed causes most avoidable hits.
- Chasing the bodyguard without clearing shield mechanics. This turns a manageable phase into a prolonged attrition fight.
- Aiming at BMP enemies during the aerial opening instead of destroying incoming explosives first.
- Using the
Ray Gunor another high-damage weapon in a way that sacrifices consistency on small targets like speakers.
Efficiency notes for clean clears
If your goal is simply to finish the endgame rather than sweep collectibles, keep the route narrow. Some guides map completionist pickups through the mission, but exact collectible counting is less important than maintaining combat flow during this sequence. Finish the boss logic first; revisit missed extras on a separate pass if needed.
The fight also rewards stable aim settings more than aggressive sensitivity. Speakers, explosives, and weak points are all target classes that benefit from control rather than speed. On either PC or console, a slightly slower, more deliberate setting usually performs better here than a twitch-heavy setup designed for close-range duels.
In operational terms, Big Mouse, Little Hope is a priority test. Destroy explosives before enemies, speakers before bosses, safe lanes before damage, and room control before heavy-target tunneling. If those priorities stay in order, the final mission is straightforward.