Starfield: Terran Armada Ship Parts & Builds – NASA-Tactical Guide
Terran Armada Reality Check: What You’re Actually Building With
If you’re trying to build a “Terran Armada” ship in Starfield, the first thing to understand is this: the game doesn’t secretly hide Terran-only ship modules. Every effective Terran-style build I’ve flown is put together from the same high-tier vanilla parts you already know, just tuned for robot-heavy incursions and sustained dogfights.
In practice, that means three priorities:
- Maximizing power to weapons and shields with the best reactor you can install
- Keeping hull and mass efficient in a NASA-tactical style (light fuel, just enough gear, strong engines)
- Leaning into weapons and defenses that excel against robots and shields
I went down the rabbit hole looking for “new Terran modules” and came to the same conclusion as most builders: there are no documented, exclusive Terran Armada parts right now. So instead of chasing ghosts, it’s better to think in packages: how you combine existing modules into things like an evasive stealth drive setup or a shield refractor unit approach. I’ll show you how I do that below and give three concrete ship layouts you can copy or tweak.
Core Systems: Reactors, Shields, and Drives for Terran-Style Ships
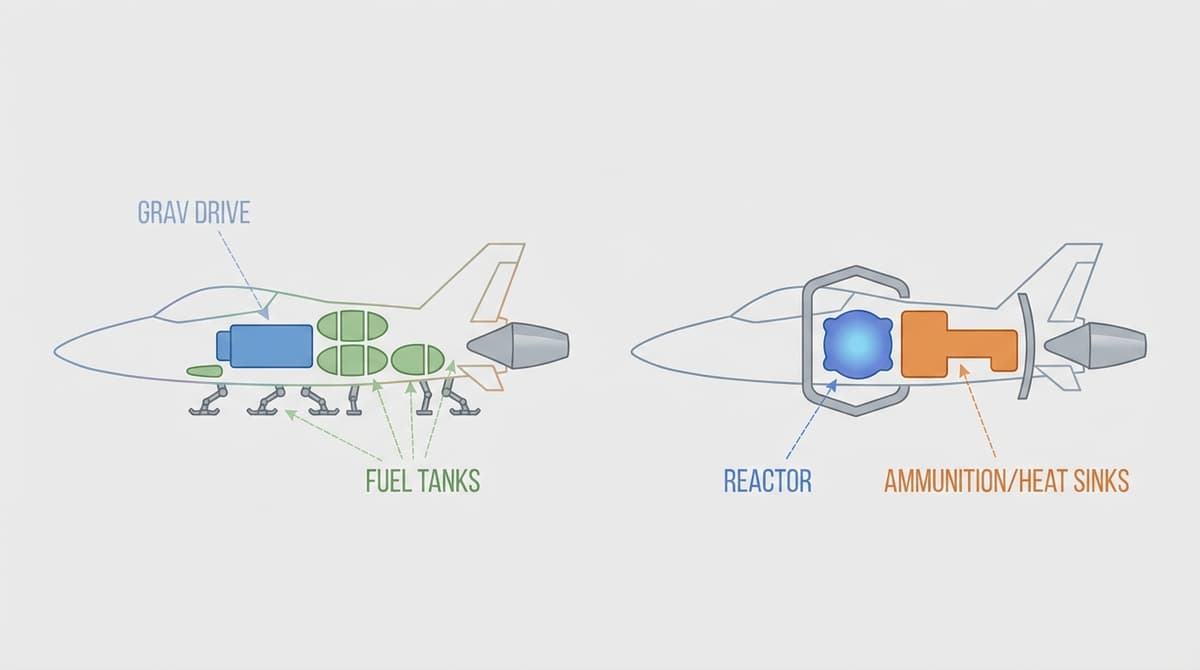
Reactors – Why I Favor a “Micro Reactor” Philosophy
Terran Armada fights are usually dense, chaotic, and full of robots. You want a reactor that can keep weapons and shields topped at all times without making your ship a flying brick.
On my smaller fighters I follow what I call a micro reactor philosophy: go for the smallest, highest-output reactor the hull class allows, instead of just slapping on the physically biggest one. That keeps mass down while still letting you fully power:
- Primary ballistic or laser battery
- EM or missile backup bank
- Max shields
- Engines with at least 2-3 pips for maneuvering
When I tried the “just max reactor size” approach, I kept ending up with sluggish ships that needed extra engines and gear just to move properly, which cancelled out the benefit. Finding that sweet spot where your reactor output matches your combat power budget is the first real breakpoint for Terran builds.
Shields – Building a Practical “Shield Refractor Unit”
Robots, turrets, and drones in Terran-style incursions love focus-firing you. Raw shield HP matters more than fancy tricks, but there’s a power-management angle that I think of as my shield refractor unit.
In my loadouts, “shield refractor unit” isn’t a special part name; it’s how I configure my shields and power:
- Pick the highest health shield in the class with good resist spread (especially EM and energy)
- Allocate one more pip to shields than you strictly “need” so they refill quicker between bursts
- During approach, overcharge shields by pulling power from secondary weapons
- Once I’m behind or above a target, I briefly shift a pip from shields to engines or weapons for kill pressure
This power juggling is what makes your shield behave like it’s “refracting” incoming bursts instead of just eating them. If you keep shields underpowered, they never recover between enemy salvos and you get shredded, especially by multiple robots or turrets.
Engines and Grav Drives – The “Evasive Stealth Drive” Package
There’s no official “evasive stealth drive” module in Starfield, but the way you combine engines, grav drive, and power can absolutely make your ship feel like it has one.
What I call my evasive stealth drive setup looks like this:
- High-thrust, efficient engines that still leave room for weapons and shields
- A grav drive with decent jump range but not overkilled to the point of bloating mass
- At least 3 pips to engines by default during combat
- Boosting aggressively during missile lock warnings to break line of sight rather than face-tanking
When I flew bulky Terran ships with underpowered engines, I kept eating missile volleys and railgun shots. Once I treated my drives as my “stealth” – using speed and vector changes as my anti-lock tool – I died less, even without any in-game cloaking.
Structure & NASA-Tactical Efficiency: Habs, Cockpits, Gear, Fuel
Double-Deck Habs and Cockpit Choices
Terran Armada-style ships in my save tend to be crewed gunships or lean interceptors. For anything bigger than a pure fighter, double-decker habs are the easiest way to get both crew space and structural integrity without killing aesthetics.
- Double-decker hab stacks let you concentrate mass near the center, which makes balancing landing gear and thrust simpler.
- A compact NASA-style cockpit (rather than some of the bulkier panoramic ones) keeps your nose light and maneuverable.
- Multiple habs also help distribute attachment points so weapons and shields can sit closer to your center of mass.
I made the mistake early on of building “tall” Terran ships with scattered habs and huge glass cockpits. They looked cool and flew like wet cement. Consolidating into dense double-deck cores and slimmer cockpits fixed a lot of handling issues without touching engines.
Landing Gear, Fuel, and “Buoyant Insulators”
NASA-tactical loadouts live or die by efficiency. The rule I follow now:
- Use just enough landing gear to support your mass (Pinpoint 3G landing gear is a popular pick because it’s strong and compact).
- Run lighter fuel tanks and rely on nav planning instead of overbuilding for marathon single jumps.
- Keep your heaviest modules (reactor, shield, cargo) close to center so your ship “sits” comfortably in both flight and landing.
I nickname this balance of mass and protection my buoyant insulators setup: the ship feels “buoyant” in space, not nose-heavy or tail-draggy, while armor, cargo, and shielded components “insulate” your essential systems. There’s no specific “buoyant insulators” part – it’s just how you place and choose modules so your center of mass and center of thrust play nicely together.
FinalBoss // Gear
Level up your setup
01Best-selling Xbox Series X|S gameson Amazon→02Xbox controllerson Amazon→03Top-rated gaming headsetson Amazon→04Discounted game keyson Kinguin→Affiliate links · As an Amazon Associate, FinalBoss earns from qualifying purchases.
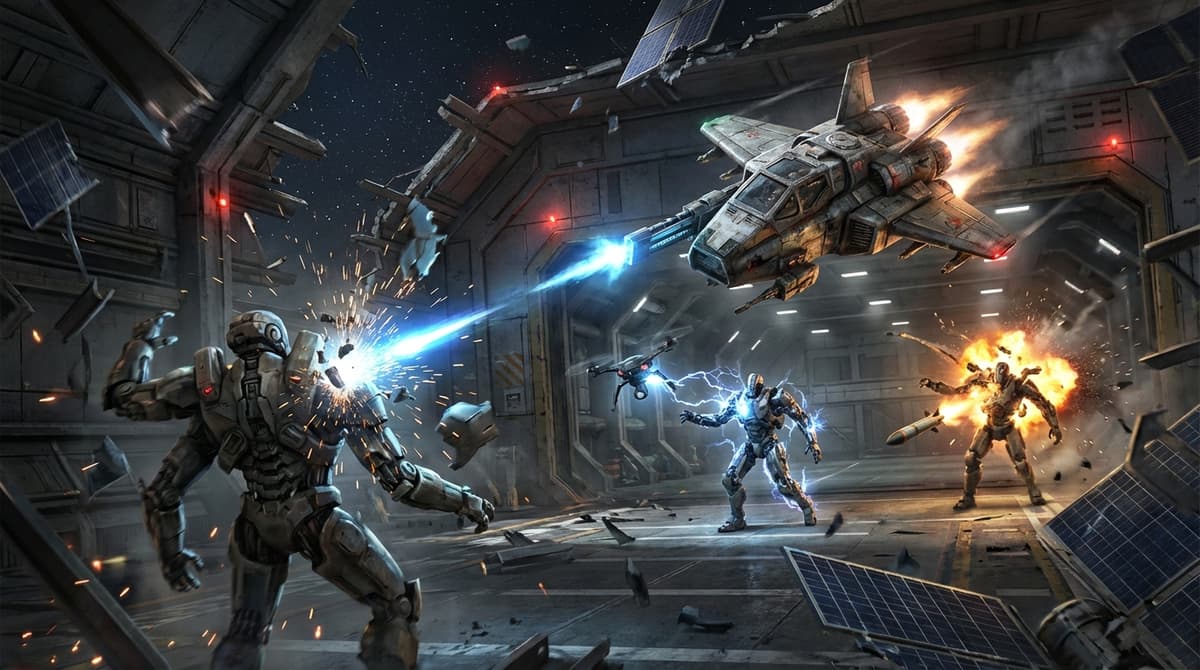
Weapons for Robot-Heavy Armada Fights
Every nasty Terran encounter I’ve had was stacked with robots, drones, or robot-manned ships. That strongly shapes what works.
- Non-automatic weapons (manual ballistics/lasers) hit harder per shot and make better use of limited power.
- Turrets are solid backup, but shouldn’t be your main DPS if you care about time-to-kill.
- Automatic weapons feel flashy but chew power for mediocre damage if you’re not specced into them.
- Missiles and EM weapons are fantastic for stripping shields and disabling robots.
If you’re chasing legendary rolls, Saboteur is the standout effect against Terran Armada’s robot spam. Weapons with Saboteur chew through robotic enemies and can trivialize certain boarding actions or defense events once you’re dialed in. I wasted a lot of time trying to make fancy elemental effects work before accepting that “kill robots faster” is usually the right answer.
Want to Level Up Your Gaming?
Get access to exclusive strategies, hidden tips, and pro-level insights that we don't share publicly.
Ultimate Guide Strategy Guide + Weekly Pro Tips
Defensive Tech Packages: “Anti-Targeting System” and Power Tricks
Starfield doesn’t hand you a literal anti-targeting system module, but you can approximate one with your build and playstyle. When I say “anti-targeting system” in my notes, I mean this combo:
- Enough engine thrust and power to boost out of firing arcs the moment you hear a lock tone.
- Weapons with good burst so you can delete the biggest threat quickly instead of tanking everyone at once.
- Smart use of cover from asteroids, stations, or even large enemy ships to break line of sight.
- Perks that improve ship handling and damage mitigation.
Stack that on top of a strong shield package and your ship feels like it has some invisible “anti-targeting” tech, even though it’s really just power and piloting discipline.
The same goes for fictional-sounding systems like an evasive stealth drive or shield refractor unit: they’re shorthand for how you combine existing modules and power allocation, not hidden shop items.
Three Terran Armada Ship Builds That Actually Work
Here are the three Terran-style layouts I keep coming back to. Treat them as templates, not blueprints you have to copy bolt-for-bolt.
1. “Terran Needle” – NASA-Tactical Interceptor
This is my go-to for fast Terran incursions where I care more about winning dogfights than hauling loot.
- Core: High-output micro reactor, top-tier shield, compact NASA cockpit
- Drives: Lightweight engines and grav drive tuned as an evasive stealth drive package (high thrust, decent jump, 3 pips to engines)
- Weapons:
- Primary: Non-auto ballistic cannons with Saboteur
- Secondary: EM beam battery for shield stripping and robot disabling
- Minimal turrets for cleanup only
- Structure: Minimal habs, just enough cargo; landing gear like Pinpoint 3G to keep mass low and stable
Flying this feels like piloting a scalpel. Your micro reactor feeds exactly what you need: maxed weapons and shields, with engines always ready for a boost. The trade-off is low cargo and limited crew, so it’s not a long-haul platform.
2. “Terran Bulwark” – Double-Deck Gunship
When I want a classic Armada bruiser that can survive multiple waves, I build something closer to a Terran Bulwark.
- Core: Larger reactor (still mindful of mass), very high HP shield configured in a shield refractor unit power profile (overpowered during approach)
- Structure: Double-decker hab column as the spine, heavier armor, larger cargo capacity
- Drives: Engines and grav drive tuned more for carrying capacity than knife-fight agility, but still maintaining a functional evasive stealth drive feel with smart power use
- Weapons:
- Manual ballistic or laser battery up front
- Missile racks on the flanks
- Turrets covering blind spots
This is the build where my “buoyant insulators” philosophy really shows: by keeping the double-decker core dense and centered, the ship stays surprisingly maneuverable for its size. It’s also the build where I’m happiest to lean into an anti-targeting system playstyle, using bulk plus positional play instead of pure dodging.
3. “Terran Warden” – Robot Hunter Corvette
The Warden is my answer to robot-heavy boarding and defense missions: all about control and disabling.
- Core: Mid-size micro reactor (over-specced for weapons and EM, under-specced for cargo), strong shield
- Weapons:
- Primary: EM lasers or particle beams with Saboteur
- Secondary: Missiles or ballistics to finish off disabled ships
- Minimal or no auto weapons
- Drives: Balanced engines and grav drive; not as twitchy as the Needle, but still able to reposition quickly
- Structure: Compact hab layout, lighter armor than the Bulwark but more than the Needle
This is where Terran Armada’s robot density becomes an advantage instead of a problem. EM plus Saboteur just deletes robotic threats, and you can lean on your shield refractor unit power profile to soak the first volley before you start disabling everything that moves.
Across all three builds, the pattern is the same: focus your reactor, shields, and drives into a coherent package (micro reactor, evasive stealth drive, shield refractor unit, anti-targeting system as a playstyle), then pick weapons that make sense for Terran Armada’s robot-heavy combat. Once I stopped chasing mythical exclusive Terran parts and started thinking in these packages, my ships became both deadlier and easier to fly.