

Thirteen named bosses define the main combat progression in Onimusha: Way of the Sword, while the Boss Rematch menu expands that total to 18 entries by separating enhanced forms, altered rivals, paired encounters, and upgraded versions. The practical Onimusha boss order begins with Sasaki Ganryu at Rendaino and ends with Minamoto no Yoshitsune’s three-phase final battle. Use this page as the campaign route, then treat each repeat encounter as a new mechanical check rather than a recycled fight.
The consistent rule across the full boss run is simple: timed defense drains stamina, depleted stamina creates a finisher opening, and large elemental or arena-wide attacks must be avoided with movement. Parry and deflect attacks you can read cleanly. Dodge charges, beams, ground hazards, grabs, and attacks that continue through several hitboxes.
Table of Contents (22)
Onimusha: Way of the Sword Boss Order at a Glance
| Story sequence | Boss or encounter | Location | Best defensive answer |
|---|---|---|---|
| 1 | Sasaki Ganryu | Rendaino | Parry or deflect his committed sword slashes. |
| 2 | Daidara | Kiyomizu, during “The Stage is Set” | Dodge laterally around whip-sword lines and grabs. |
| 3 | Rasho-gan | Early-mid story shrine route | Dodge eye beams and tendrils; parry value is limited. |
| 4 | Ifuu and Burai | Kennin-ji | Deflect Ifuu’s melee; dodge Burai’s lightning zones. |
| 5 | Nue and Dokyo encounter | Nijo Castle | Dodge Nue’s charges; deflect incoming projectiles. |
| 6 | Benkei | Gojo Ohashi | Parry or deflect committed bridge-rush strings. |
| 7 | Sasaki Ganryu rematch | Yasaka Pagoda | Deflect sword strings, then dodge multi-hit extensions. |
| 8 | Shuten Doji | Mount Ooe | Dodge flame arcs, rushes, and airborne pressure. |
| 9 | Ifuu and Burai rematch | Late-game route | Dodge overlapping AoEs; deflect only isolated melee. |
| 10 | Dokyo | Arashiyama | Deflect projectiles and dodge large beam telegraphs. |
| 11 | Benkei revived | Rendaino | Dodge shockwaves and cannon fire; parry slow swings. |
| 12 | Minamoto no Yoshitsune | Final arena | Deflect sword strings and dodge unblockable AoEs. |
Daidara sits within the Kiyomizu story segment commonly labelled “The Stage is Set.” Greater Nue is an upgraded Nue variant that appears as its own Boss Rematch entry, even though it is not a separate named boss in the 13-boss count.
Early Bosses: Establish the Defensive System
Sasaki Ganryu — Rendaino
Full fight guide: How to beat Sasaki Ganryu and Gioh
Ganryu is the first major duel and the cleanest tutorial for the game’s defensive tempo. His single sword slashes are deliberately readable, making parries and deflects more efficient than repeatedly rolling away. A successful deflect damages his stamina bar directly; stay close after the clash and use the opening before he resets his spacing.
Defense that works: Parry or deflect the final hit of his sword strings, then punish his recovery instead of chasing him after every dodge.
Daidara — Kiyomizu
Full fight guide: How to beat Daidara with parries
Daidara shifts the emphasis from duel timing to positional discipline. The whip-sword reaches farther than its windup initially suggests, and his grab attempts punish staying directly in front of him. Keep enough lateral space to identify whether he is beginning a line attack, a wide sweep, or a grab. The later encounter is tighter and gives the extended whip-sword phase more value, so avoid trapping yourself against the arena edge.
Defense that works: Dodge sideways through whip-sword lines and move away from grab range; do not spend the fight trying to force parries on extended attacks.
Rasho-gan — Early-Mid Story
Full fight guide: How to beat Rasho-gan safely
Rasho-gan is a two-health-bar endurance fight built around eye beams, ranged pressure, and tendrils that turn portions of the arena unsafe. This is a movement check. Maintain lock-on long enough to track its body, but release your attack sequence when tendrils begin occupying the ground around you. Its ranged patterns leave punish windows after the final projectile rather than during the opening shots.
Defense that works: Dodge beams and ground tendrils, then return only after the ranged sequence ends.
Mid-Game Bosses: Handle Overlapping Threats
Ifuu and Burai — Kennin-ji
Ifuu and Burai are introduced as wind- and lightning-focused threats before their later combined rematch. Their Kennin-ji encounter demands target discipline. Ifuu is the more suitable deflect target because the wind-charged melee strings are compact and readable. Burai creates larger lightning telegraphs that should be avoided instead of challenged. In the duo sequence, keep both bosses on screen and avoid spending a full combo unless the second boss is recovering or out of range.
Defense that works: Deflect Ifuu’s close strings; dodge Burai’s lightning fields and large cast animations.
Nue and Dokyo — Nijo Castle
Nijo Castle combines the chimera threat of Nue with projectile-focused pressure. Nue punishes stationary attacks through charge lines, elemental breath, and sweeping body movement. Its tail is a priority target when available: breaking a chimera tail in one decisive strike removes roughly half of that enemy’s attack options. That reduction is worth taking a brief risk when the boss has just missed a charge.
Greater Nue is the later upgraded form. It uses the same core answer at a higher intensity: respect its wider elemental swings, dodge the charge routes, and only deflect slower close-range swipes when the animation is unmistakable.
Defense that works: Dodge Nue’s charge and breath patterns; deflect projectile attacks only when their timing is clear and the arena is not already covered by hazards.
Benkei — Gojo Ohashi
Benkei’s first battle takes place on Gojo Ohashi, where bridge width makes constant evasive movement inefficient. His rush combos are highly committed, which makes this a stamina-damage fight. Guard the initial pressure, use the deflect input immediately before the strike lands, and capitalize when his weapon finishes its path. Do not retreat to the end of the bridge; that removes your lateral room and makes the next rush harder to read.
Defense that works: Parry or deflect the committed rushes, then strike during his long recovery.
Late Bosses: Rematches Change the Required Response
Sasaki Ganryu Rematch — Yasaka Pagoda
The Yasaka Pagoda rematch is not solved by replaying the Rendaino duel unchanged. Ganryu’s altered form adds longer strings and Oni-related pressure, so a single early deflect does not always end the sequence. Wait for the final committed hit, then use a perfect deflect chain to remove stamina. Dodge becomes necessary when the attack continues beyond a safe guard response.
Defense that works: Deflect the clean sword finishers and dodge the extended multi-hit sequences rather than blocking them in place.
Shuten Doji — Mount Ooe
Shuten Doji has two distinct combat states: a fire-based humanoid phase followed by more chaotic flying-head pressure. Blocking has limited usefulness against the fire patterns, especially when the attack covers a broad arc or crosses the arena. Preserve stamina for circle-strafing and directional rolls. The safest punish windows occur after a flame arc finishes or a rushing pattern carries past your position.
Defense that works: Dodge through flame arcs and rushes; reserve parries for isolated melee swings only.
Ifuu and Burai Rematch
The late duo rematch overlaps wind pressure, lightning zones, projectiles, and tag-team attacks. It is one of the clearest examples of why a deflect-first approach can fail. A successful deflect against one boss is irrelevant if the second boss has already placed an area attack beneath you. Keep moving around the outer edge, identify one boss as the temporary focus, and only commit when the other is locked into a long animation.
Defense that works: Dodge the combined AoEs and projectiles; use deflects only against isolated melee attacks.
Dokyo — Arashiyama
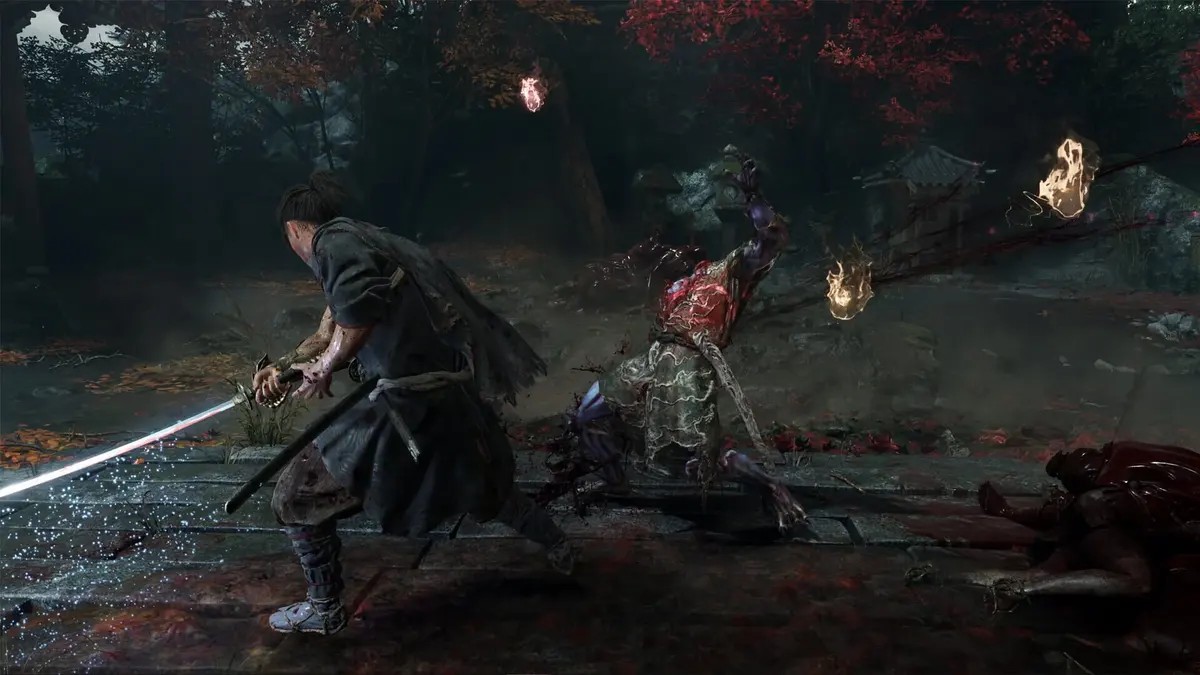
The Arashiyama fight is structured around projectile recognition, beam avoidance, and recovery punishes. Do not trade at close range simply because an opening looks available. Deflecting a direct projectile preserves pressure and can create a better return window than a long roll. Large beams remain a dodge requirement; their size and lingering coverage make defensive timing less reliable than moving clear.
Defense that works: Deflect readable projectiles, dodge broad beams, and punish the end of each ranged sequence.
Benkei Revived — Rendaino
Benkei returns at Rendaino in a fully armed, revived form with daggers, an axe, and cannon-style shockwaves added to his bridge-fight toolkit. The fight alternates between attacks that should be deflected and attacks that should never be challenged head-on. Axe swings and forward lunges remain slow enough to parry. Shockwaves, cannon fire, and broad weapon coverage require distance and a directional dodge.
Defense that works: Dodge shockwaves and cannon fire, then parry the slow axe swings and lunges.
Final Boss: Minamoto no Yoshitsune
Full fight guide: How to beat Yoshitsune (final boss)
Minamoto no Yoshitsune is the final boss and the most demanding complete test of the game’s combat systems. The encounter runs through three phases, escalating from sword-string timing into larger Oni-focused attacks and arena-wide pressure. Treat each phase as a separate resource check: enter with consumables available, avoid wasting special-weapon meter during short invulnerable transitions, and prioritize survival when the arena begins forcing movement.
The strongest damage sequence comes after stamina depletion. Deflects inflict substantial stamina damage, and a broken stamina bar opens the boss to a finisher. An Een counter can accelerate that process: press attack at the instant an incoming strike would connect to evade and counterattack in one motion. Its timing window is tighter than a parry, so use it on attacks already understood rather than treating it as the default answer.
Defense that works: Parry or deflect the sword strings, dodge unblockables and arena-wide attacks, and use Een only on consistent melee reads.
Boss Count and Rematch Menu Explained
The campaign has 13 named bosses: Byakue, Dohatsu-ten, Nue, Sasaki Ganryu, Daidara, Rasho-gan, Greater Nue, Benkei, Ifuu, Burai, Shuten Doji, Dokyo, and Minamoto no Yoshitsune. The Boss Rematch menu contains 18 entries because it separates enhanced and altered forms, including Byakue and Dohatsu-ten variants, the Nue pair, altered Ganryu, fully armed Benkei, and the Ifuu & Burai duo.
Byakue and Dohatsu-ten are rift-linked mini-boss encounters rather than fixed points in the main story route above. Defeating them matters for progression because their rewards include Byakui’s talismans and Dohatsu-ten’s horns, materials used alongside Malisite and Malisite masses for gauntlet upgrades. Malisite rewards come from closing rifts, so clearing these encounters strengthens the tools used in later boss fights.
Hardest Boss and Preparation That Carries Through the Run
Minamoto no Yoshitsune is the hardest boss because all three phases require accurate timed defense, movement discipline, and resource management. The main fights most likely to stop a first campaign before then are altered Ganryu, Greater Nue, the Ifuu and Burai rematch, Shuten Doji, and revived Benkei.
- Open small Kyoto chests along building edges, walls, and carts to maintain iron for sword upgrades and cloth for clothing upgrades.
- Use the guiding light input,
L2 + R2, when a boss route or side path requires reaching an area from the opposite side. - Hold six consumables at once; empty slots refill from pickups, so enter major arenas with open slots filled rather than carrying unnecessary duplicates.
- Swap talismans around the encounter’s damage type. Health, stamina, damage, and defense boosts matter more when matched to the boss’s main pressure pattern.
- Use purple body-part break Een choices when health recovery or blue special-weapon meter is more valuable than immediate damage. Use red-mark breaks when the fight is ending and maximum damage is the priority.
The full campaign generally takes 25 to 30 hours, but the boss route becomes substantially cleaner once defense is chosen per attack type: deflect readable weapon strikes, dodge hazards and unblockables, and convert every stamina break into a finisher before the boss can reset.
Boss order by training priority
The story presents the encounters in its own progression order, but the skills carry forward in a clear sequence. If you hit a wall, return to the earlier boss that teaches the missing defense instead of repeatedly spending attempts on the current gate.
- Start with duel fundamentals: Sasaki Ganryu teaches the rhythm for parry, Deflect, and Issen. Burai adds the discipline of recognizing a stance where attacking is the losing choice.
- Build stamina-break discipline: Shuten Doji, Benkei, and Dohatsu-Ten reward controlled target selection. They expose the weakness of blocking an entire combo or hitting whatever body part is closest.
- Practice movement-based defense: Nue and Ifuu demand Reflex Dodge, bow pressure, and positioning. These fights prepare you for blue telegraphs and larger arena threats.
- Manage space and resources: Rasho-Gan, Daidara, Byakue, and Ningyo add hazards, soul control, projectile pressure, and long strings that punish tunnel vision.
- Finish with complex pattern play: Dokyo and Minamoto no Yoshitsune combine several earlier lessons. Enter these fights with Oni Power full or nearly full, then spend it after a parry, stagger, or clearly missed attack.
How to route all 18 Boss Rematch entries
Each boss becomes eligible for rematches after its first story defeat. The 18-entry rematch roster has five more encounters than the 13 named-boss baseline because it includes stronger versions, altered move sets, and paired fights. Use it as a targeted practice board: enter the rematch that teaches the mechanic blocking your current story progress, clear it, then return to the campaign.
| Rematch type | What changes | Best reason to run it | Priority |
|---|---|---|---|
| Standard return fights | The original boss pattern returns after its story clear. | Learn a single string, improve Deflect timing, or safely rehearse Issen windows. | First choice when a story boss has a familiar archetype. |
| Enhanced variants | Higher health, stamina, and more demanding enrage thresholds. | Practice maintaining pressure so the stamina bar does not recover between openings. | Run after the base matchup feels reliable. |
| Altered variants | New white or blue telegraphs and dodge-only attacks are added to older patterns. | Train recognition rather than memorizing the old rhythm blindly. | Run before late bosses that mix counter types. |
| Armor-focused variants | Armor, shields, Helm Splitter, and Break Issen target choices matter more. | Rehearse body-part targeting for Benkei- and Dohatsu-Ten-style defenses. | Best when direct damage feels unusually low. |
| Paired variants | Two threats share the arena, increasing camera and spacing pressure. | Learn to keep both enemies visible and remove the more volatile target first. | Save for after solo fights are consistent. |
| Soul-focused runs | Purple Break Issen opportunities produce greater resource value. | Refill health, Oni Power, and Awakening resources before difficult late progression. | Use between major story attempts rather than grinding unrelated entries. |
For paired rematches, use lock-on sparingly. Keep both enemies in frame, move laterally instead of rolling directly away, and use Break Issen to remove the weaker or more erratic partner as soon as its stamina breaks. Turning a duo into a one-on-one fight is worth more than squeezing extra damage out of the healthier target.
For soul farming, choose purple Break Issen prompts and accept the longer kill. Purple rewards can release yellow health souls, blue Oni Power souls, and purple Awakening souls, making these rematches useful preparation for Yoshitsune’s final phase. Death in either story fights or rematches does not remove souls or items, so early rematch attempts are ideal scouting runs.
Boss-route mistakes that waste the most attempts
- Forcing Issen every opening: Issen is the biggest single punish, but a missed counter against an enraged boss can end the attempt. Use Deflects to make steady stamina progress until the timing is certain.
- Holding block through full strings: Guard stamina drains while blocking. Block the uncertain transition, then Deflect the attacks you recognize.
- Using Oni Power for chip damage: Save it for a stagger, a clean parry, or a whiffed heavy attack. Confirmed openings give the gauge its real value.
- Ignoring arena souls: Collect them promptly, especially against Daidara and during rematches built around purple Break Issen rewards.
- Continuing old patterns after enrage: Enraged bosses can speed up attacks or change telegraph behavior. Reset to safe Deflects and dodges until the altered sequence is clear.
- Grinding every rematch immediately: The rematch roster is most efficient when it solves a specific problem: armor tracking, Reflex Dodge, long Deflect chains, duo control, or resource recovery.
Clear the 13 named bosses through story progression, use the 18 rematch entries to isolate the mechanic that is failing, and build every matchup around stamina damage before Break Issen. That route keeps the late phases manageable without detouring into rematches that do not improve the next fight.
Every Onimusha: Way of the Sword guide on FinalBoss
Updated 15 September 2026. Boss-route and rematch sections below were merged from our earlier route guide.
- Bosses: Sasaki Ganryu and Gioh · Daidara · Rasho-gan · Dohatsu-ten (and horn farming) · Byakue · Yoshitsune (final boss)
- Combat: Defense, Blaze and Issen · Parry and Soul tips to avoid early deaths
- Progression: Best build, skill tree and upgrade priority · Best Oni Armaments, ranked · Charms and slots · Carnage New Game+ carry-over · Ending explained and post-game
- Platforms: Switch 2 tech guide (30fps vs unlocked) · Switch 2 vs PS5, Xbox and PC
FinalBoss // Gear
Level up your setup
01Top-rated gaming headsetson Amazon→02High-refresh gaming monitorson Amazon→03Gaming chairson Amazon→04Discounted game keyson Kinguin→Affiliate links · As an Amazon Associate, FinalBoss earns from qualifying purchases.
Want to Level Up Your Gaming?
Get access to exclusive strategies, hidden tips, and pro-level insights that we don't share publicly.
Ultimate Guide Strategy Guide + Weekly Pro Tips